Step 5: Entering the Job End Date and Specifying the Approval Queue
The next section is for indicating when the job will end, followed by a section for indicating who will approve and finalize your EPAF.
‘Terminate a Job’ Section
All fields in this section say “Not Overrideable”, and they cannot be altered.
The “Job End Date” should reflect the last day of the late pay period for the term you are in.
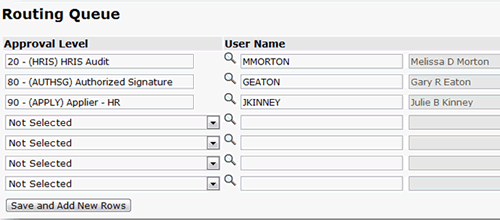
‘Routing Queue’ Section
The Routing Queue section is for specifying who will approve your EPAF. If you have already set up your default routing queue beforehand for this EPAF type, you can disregard this section.
Use the ‘Magnifying Glass’ search icon to find the login name associated with the person you’re looking for.
- Type in the Banner login name of your HRIS Specialist on the first line
- Type in the Banner login name of your Supervising Manager on the second line
- Type in the Banner login name of the Manager of HR systems development (currently Julie Kinney) on the third line
Click SAVE when you’re done.

Comments
You can put comments into this section if you anticipate needing to retrieve information about the job at a later time.
Please note that comments will become part of the employee’s permanent Banner EPAF record and cannot be changed.
Save and Submit
Whether or not you add a Comment, click the Save button at the bottom of the screen when you’re done.
Next, press the Submit button near the top of the screen.
If submitted successfully, your EPAF now moves to the Approver’s queue for approval.

Errors and Warning Messages
If you received Errors or Warning messages, don’t be alarmed. In many cases these can be disregarded, but some Errors must be addressed before your EPAF is submitted successfully. If you didn’t get the “successfully submitted” message shown in the illustration above, there is probably an Error you must address.
Therefore, the next step is to Review Errors and Warning Messages (Step 6 – click ‘Next’ below).
