FAQs
Q: I click on the zoom meeting but I can’t record or can’t use the Breakout Rooms or can’t do Screen Share or can’t use annotations. Are you the one creating the room?
A:
- If no, you can’t be the host if you didn’t create the room unless the room creator is there with you and assigns you as a host or co-host access.
- If yes, do you have the host role when you’re in the meeting? Check the Participant window to see if you’re accessing the meeting and have the host role.
- You need to use a computer with Windows or MacOS to have the full options inside the zoom meeting.
- You also need to make sure that you are signed in to the Zoom client using your PCC Zoom credentials (follow Option 1).
- Don’t forget to update your Zoom client (you can’t be in the Zoom meeting to update the zoom client app).
- Check your settings in the PCC Zoom website (portlandcc.zoom.us), you may need to enable your zoom setting for using annotations tool or screen share.
- When you’re in the zoom meeting and sharing your screen, check the Security icon if you want to allow your students to share their screen or annotate on the shared screen.
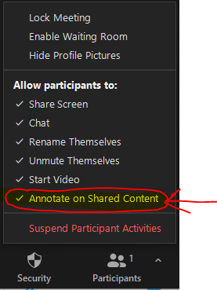
- Where did you create the room? If you go there and only see the Join button and not the Start button, it means you are not the owner of the room.
Option 1: From Zoom inside D2L course
If you created it inside D2L Brightspace, to have a host control, make sure you use the Zoom link from the course navbar inside Brightspace and click the Start button next to the meeting name or sign in from the PCC Zoom website (portlandcc.zoom.us), click Meetings on the left and click Start next to the meeting name.
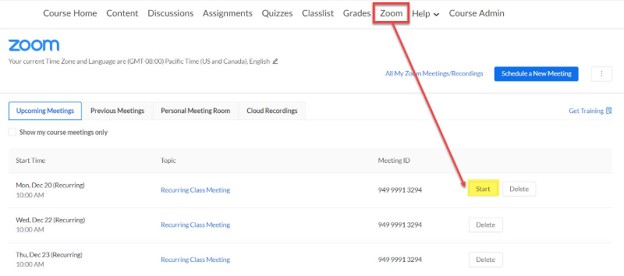
Option 2: From the PCC Zoom website
If you created the room on the PCC Zoom website (portlandcc.zoom.us), SIgn in and click on Meetings on the left side. Find your meeting and click the Start button.
Q: I want to have a one-on-one meeting with my student or with another instructor. How do I do that?
A: We recommend you to create a dedicated meeting and not use your own personal meeting room. Create a separate meeting from the PCC Zoom website and not use the Brightspace Zoom so other students or uninvited guests won’t access the meeting by accident.
Option 1: From the PCC Zoom website
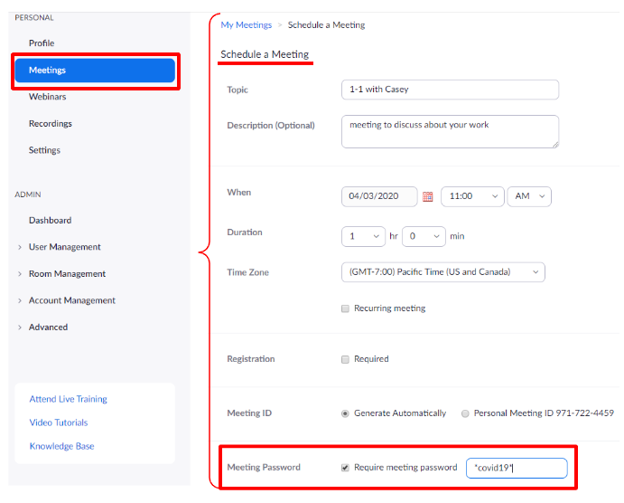
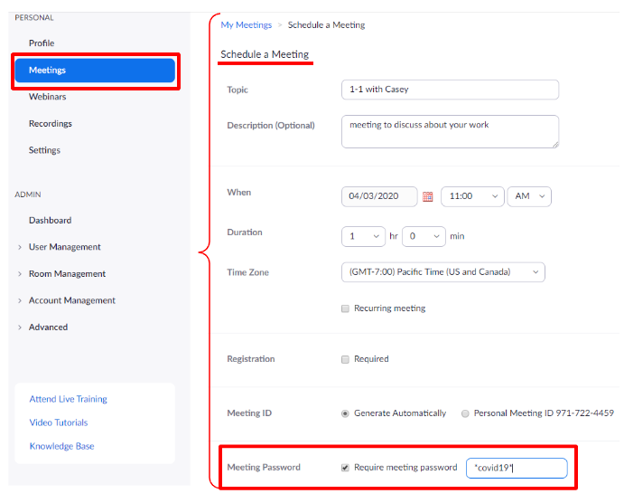
Sign in from the PCC Zoom website (portlandcc.zoom.us), click Meetings on the left and click Schedule a New Meeting with the specific date & time. We recommend adding a Meeting Password (passcode) for security and sending the meeting password in a separate email. You may not need to send a separate email for the password if the link already contains the password.
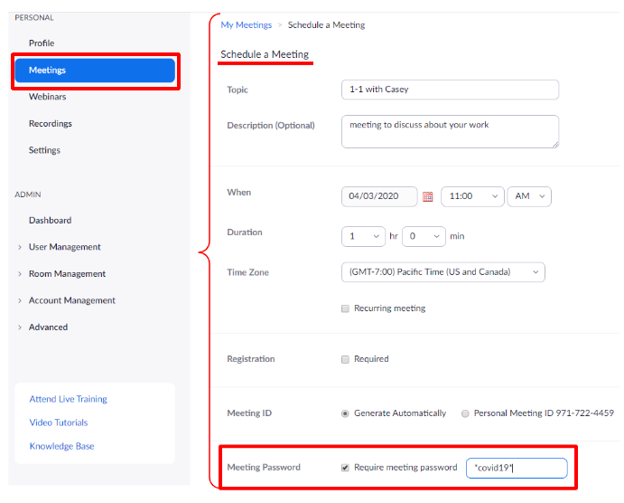
Option 2: From the Zoom Client app
Find the Zoom client app on your computer. Once you’re signed in (follow this guide to learn how to sign into the zoom client), you can click on the Schedule button and create the meeting there.
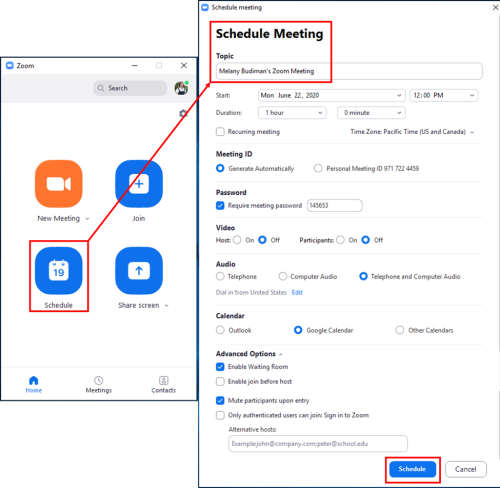
Q: I would like to have a Virtual Office Hour combining all my classes.
A: If you are not combining (crosslist) your D2L classes, then you won’t be able to create the zoom meeting using Zoom inside D2L.
You should not record your Virtual Office Hour as you normally won’t be able to do so, especially if you’re combining all your classes (FERPA regulation)
Sign in from the PCC Zoom website (portlandcc.zoom.us), click Meetings on the left, and click Schedule a New Meeting with the specific date & time. We recommend adding a Meeting Password for security and changing the password for future meetings.
Then copy the URL inside ALL your Brightspace classes in the Announcement or Content area with the password. DO NOT email the URL to the students if it’s not necessary.
Q: Can I record my class meeting if I combine (crosslist) my classes? Or Can I share a recording from one of my classes with another class?
A:
- If you don’t normally combine your face-to-face classes, students in one class aren’t normally interacting with students from another class, then you shouldn’t record, due to PCC FERPA policy.
- If you normally combine (crosslist) your face-to-face classes and students in those classes are normally interacting with each other, then you can record.
If you plan to record your live class sessions, please include language in your syllabus that provides an explicit understanding to the student of your plan. You can advise them of their options to rename themselves, and to keep their audio and video muted during recordings. Also, during the session before you begin the recording, please provide an additional notice that you are about to begin so they can make any adjustments they need.
Here is some sample text for you to use:
Note to students: “Given students potentially limited access to the internet, I plan to record our sessions together for viewing later. These recordings will only be visible to those enrolled in this class, and students have the option for additional layers of privacy by renaming themselves in the Zoom room, muting their video, and muting their audio. If you have any concerns or questions, please let me know.”
Q: I created my zoom meeting in the Brightspace Zoom. Do I need to send or post the link for my students in the class?
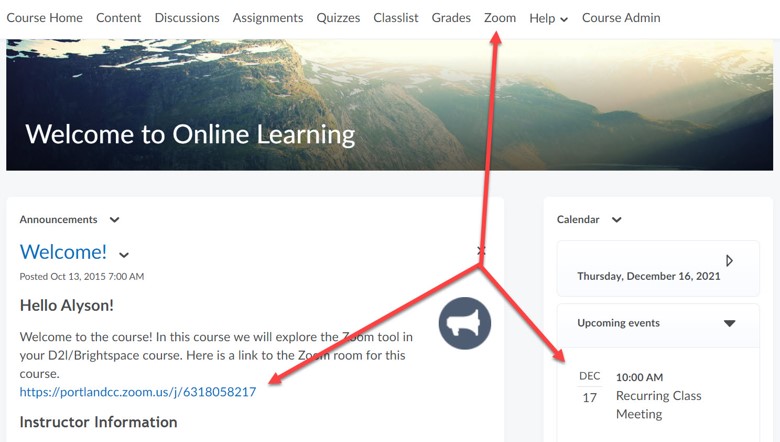
A: No. When you schedule a meeting using Brightspace Zoom, students can automatically join the meeting from the Zoom link on the course navbar or the calendar event on the Course Home.
Q: Should I use a Meeting Password (Passcode) to schedule a meeting? How does it work?
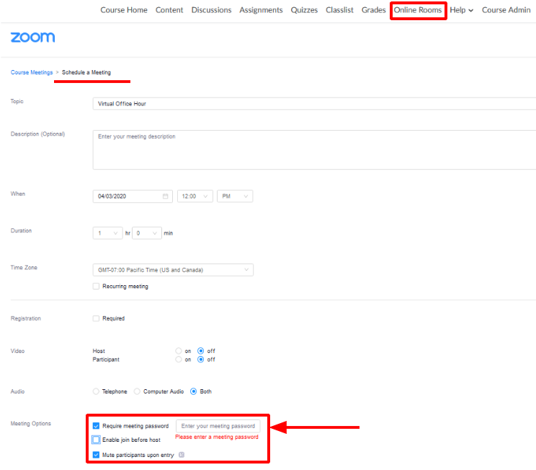
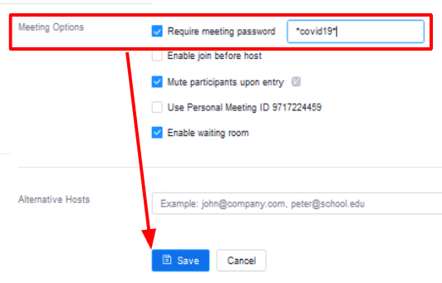
A: Yes, we recommend you do that. Part of zoom security is to create your zoom meeting using a passcode and/or waiting room. You don’t need to use the waiting room and just add a Meeting Password (Passcode) when you create your zoom meeting.
Students accessing the meeting using Zoom inside Brightspace or from the calendar event on the Brightspace Course Home, won’t need to enter the meeting password (passcode). Students accessing the meeting directly from their Zoom app or a URL may be asked to enter the meeting ID and the meeting password (passcode).
Option 1: Creating the meeting from Zoom inside Brightspace
Click Zoom from the Course navbar
Option 2: Creating the meeting from the Portland Zoom website
Sign in from the PCC Zoom website (portlandcc.zoom.us), click Meetings on the left, and click Schedule a New Meeting with the specific date & time. Add a Meeting Password (Passcode) for security.
Q: How do I delete calendar events of the wrong zoom meeting?
A: Scenario 1: I’m teaching two (2) D2L Brightspace classes and students from class A are able to join my zoom meeting in class B. How do I fix this since I only see the zoom meeting correctly in my classes?
You probably created the zoom meeting inside class B, and copied the content from class B to class A. When you created the zoom meeting inside class B, it automatically created a calendar event within that class, thus, when you copied the content to class A, the calendar event got copied even though the Zoom didn’t get copied.
What you should have done: Do not create the zoom meeting yet, but you should have copied the course content from class B to class A, then create the zoom meeting in D2L Zoom separately by going to each course to create the zoom meeting. DO NOT create the zoom meeting for both classes in the same class!
Scenario 2: You probably copy your previous D2L course where you used Zoom and use Manage dates to roll over to the current term. The calendar events from the previous zoom meeting got updated with the new dates. That’s ok. Just delete those old calendar events of the previous zoom meetings before you create a new Zoom meeting for the current class, by following these steps below.
How to fix this? Make sure that inside the D2L Zoom for each class, you only see the zoom meetings that you intended your students to join. Then you will need to go to the Calendar from the Course Home and delete the calendar event.
Note: deleting the calendar event will not delete the actual Zoom meeting.
- Go to your course and go to Course Home where you see the Calendar widget
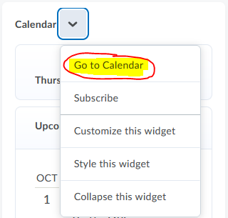
- Click the action menu for “Calendar” and choose Go to Calendar
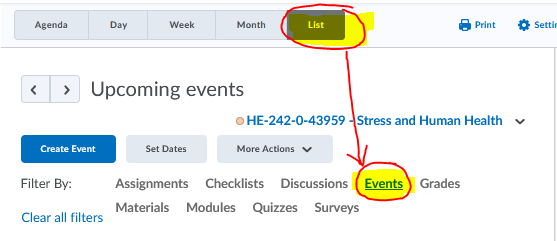
- Click on the List to view all the calendar events in your class as list items, then click on Events for “Filter By:” so you only see events for the zoom meeting events
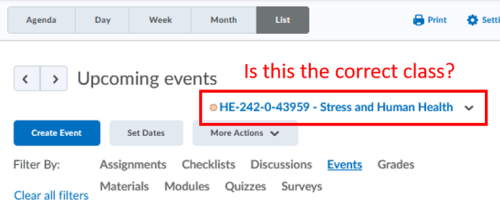
- Make sure that you’re only viewing the events you want to delete in this class
- If so, check the box next to “all the events you want to delete”, then click on the More Actions button and choose Delete
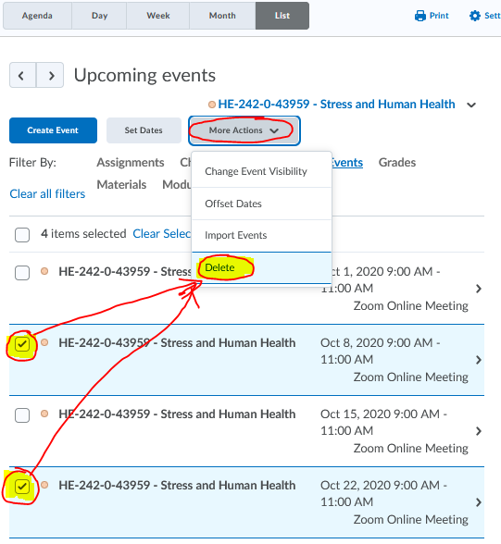
- Click the Yes button on the confirmation window to delete the events
Q: When and how do I use a zoom personal meeting room?
A: Due to the Zoom Bombing incident, we do not recommend you to use your personal meeting room. Personal meeting room is open all the time and vulnerable to unwanted guests, especially if you email the URL or meeting ID to other people, you may not know where they end up.
You can use your personal meeting room to practice using the Zoom or record your own lecture. We also recommend you add a Meeting Password (Passcode) to your personal meeting room to secure it.
Q: Can I auto record my meeting?
A: No. Unfortunately auto recording has been disabled due to a variety of concerns. You will need to manually click on the Record button during the meeting and choose between Record on this Computer or Record to the Cloud.
Q: Where should I record my meeting? How long will the cloud recording be kept?
A: Here’s how to decide where to record your meetings:
- For remote teaching situation or If you do not plan re-use your recording for future terms, then you can select Record to the Cloud
- Recordings can only be made to students who have access to your class (FERPA)
- Your cloud recording may not be available right away. You will receive an email when it’s done processing.
- You can still download a copy of the recording if you change your mind later
- You don’t need to send the cloud recording to your students. They can access it by going to Zoom and click the Cloud Recordings tab
- If you want to use your recording for future class as a lecture recording, please select Record on this Computer
- You should hide the participants’ names in the recording. Change the settings of the recordings to hide the participants name prior to your meeting. You can go to PCC zoom website (portlandcc.zoom.us), then go to settings on the left and under the recordings tab, unchecked box for “displaying participants’ names in the recording.”
- After your meeting is done, make sure you End Meeting for everyone. By default Zoom will create and point to a folder within Documents/Zoom with the title of the Room that you recorded in. Find the mp4 file and upload the recording to Kaltura.
Q: Can I use my recordings from the current class for my future class?
A: Be aware of PCC FERPA policy and do not share videos with your students’ names.
If you plan to use your recordings for future class, you have 3 options:
- use a video editing program, such as iMovie, Windows Movie Maker, Camtasia, or Adobe Premier, if you need to trim out and completely remove specific parts of the recording
- re-create your lecture recording and use your personal zoom meeting, then download and move the recording to Kaltura
- re-create your lecture recording and use Kaltura Capture.to record
Q: How do I trim or crop my zoom cloud recording? I have a somewhat private conversation at the end of the recording.
A: You can’t trim or crop the cloud recording. You can set a playback range for a Zoom cloud recording that you share with others, so that it starts and ends at the times you specify, and hides unneeded portions from the beginning and end.
The playback range is setting a specific start and stop point for others to watch the recording but it does not completely remove or trim out any parts of the recording.
- Setting a playback range is like setting particular timestamps within the recording that you want others to watch, but they will still be able to view the entirety of the recording if they download it.
- If you wish to trim out and completely remove specific parts of the recording, you will need to use a video editing program, such as iMovie, Windows Movie Maker, Camtasia, or Adobe Premier to edit the recording.
Follow this guide to learn how to set Cloud Recording Playback Range
Q: Can I record the Breakout room? Can I save the Breakout room chat? How do you communicate with the host during breakout room? How does Breakout room work?
A: You usually record the main room and when you use the Breakout rooms, you literally send the participants to other virtual rooms where they have their own whiteboard, chat, screen share. During breakout rooms, you will pause the recording in the main room.
You can assign someone as a co-host inside the Breakout Rooms, but they can only record to their own computer. It will be a separate recording file that needs to be emailed to the host and separate from the main room recording. If the meeting is set with the cloud recording, it will only record the main room, regardless of what room the meeting host is in. Same goes with the Breakout room chat, it will be saved separately.
Only 1 host role per meeting, can have many co-host. Only the host & co-hosts can control the breakout rooms (assign/ move/ exchange participants, create/ delete breakout rooms, broadcast messages into breakout rooms, and join/move between breakout rooms). Learn more about different roles and managing breakout rooms.
Note:
|
During breakout room time, the host will only be accessible when that person is in the same room as you. There’s no communication between anyone from the main room to others in the breakout rooms or the host while they’re in one of the rooms. They’re completely cut off, like physically different buildings and rooms. So you will have to use other methods outside of zoom if the host needs to communicate with the co-hosts, like using email, google chat or cell phone text message. The host can broadcast a message to everyone in the breakout rooms, but others can’t communicate nor chat with the host or others outside of the breakout room.
Participants inside the breakout room can ask for help from the host and invite the host to the breakout room.
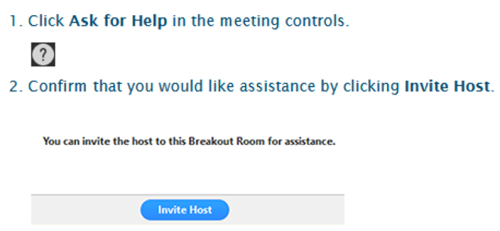
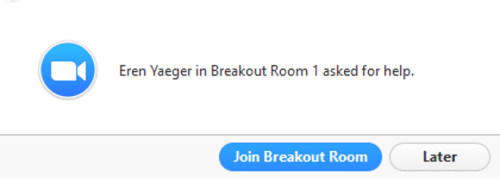
The host will be prompted with the request to join the breakout room:
During Breakout Rooms time, you should pause the recording and start when you resume the meeting and everyone is back to the main room.
Per Zoom client update on 12/7/2020, co-host now have the option to join different breakout rooms.
Q: I want to create a pre-assigned breakout room, but I can’t find how to do that. How do I create it?
A: We don’t recommend doing pre-assign breakout rooms because you will need the participants to sign in when they attend the zoom meeting using their email address that you had specified in the pre-assign breakout room. Also PCC students normally won’t have a PCC Zoom account.
Before you can create the pre-assigned breakout rooms, your participants (students) will need to have a zoom account. Most likely, your students will not have a PCC Zoom account because it is not required to have an account if you’re just joining the Zoom meeting. You can request your students to have a zoom account, by emailing dlhelp@pcc.edu with your class information and request for your students to have a zoom account. Your students will receive an email and need to activate the account within 30 days.
The tricky part is it takes time for you to create the csv file of the pre-assigned breakout rooms and you may not have all the students attend the meetings all the time, even though you have repetitive meeting occurrences. So requirements / challenges for using pre-assigned breakout rooms:
- Participants (students) will need to have a PCC zoom account
- Participants (students) will need to sign in to their zoom account prior to accessing the meeting
- You can’t force students to have a zoom account
- You can’t guarantee your students will attend all your zoom meeting
Learn more about the limitations of using pre-assigned breakout rooms.
It is much easier to just create the breakout room during the meeting and assign the participants automatically or manually into the breakout room. Learn more about managing breakout rooms.
Important to know: you must use the same emails your students use to access your Zoom meeting to post in your csv file for pre-assign breakout room to work.
Step 1: Change your Zoom settings from the PCC zoom website (portlandcc.zoom.us)
- Sign in to the PCC zoom website (portlandcc.zoom.us)
- Click on Settings on the left side
- In the In Meeting (Advanced), check the box for “Allow host to assign participants to breakout rooms when scheduling” and click the Save button

Step 2: Schedule/ Edit your meeting
- Click on Meetings on the left side
- If you schedule a new meeting, or If you’ve already created a meeting from D2L Zoom or from the PCC zoom website (portlandcc.zoom.us) or from the Zoom Client app, then you can edit the meeting to see the new option in the Meeting Options, “Breakout Room pre-assign.”
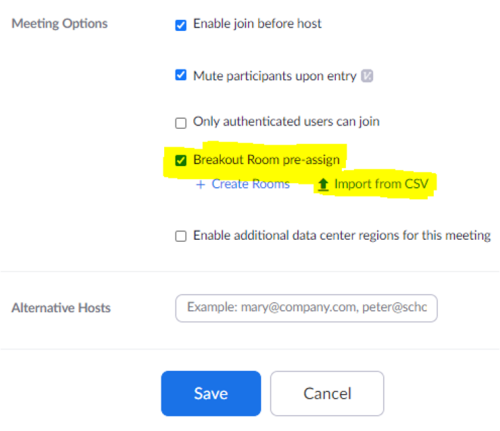
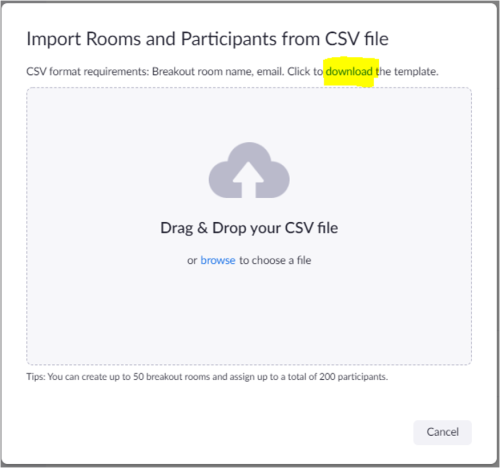
- Check the box for “Breakout Room pre-assign” and click on Import from CSV link. You should download the template first and populate the information, save it to your computer and upload it here.
Q: I’m assigned as a co-host and I can’t create Breakout Rooms. Why?
A: Only the host can create and start the Breakout Rooms. Learn more about roles in a meeting.
Q: How do I share a screen while in the Breakout rooms? I want people/students to work on the document to discuss.
A: What you do is: Before you break students and send them to the breakout rooms, post the link in the chat area. The link that contains the document that you want students to work on when they’re in the breakout rooms will be carried over once students are in the breakout rooms. You probably also need to provide shared screen access to your students in the breakout rooms, so one of them can lead and share the document to discuss.
Make sure in the Security icon inside your meeting, you have “Share screen” and Chat” checked (you must be a Host or a Co-host to see the Security icon).
![]()
Learn more about Google sharing access.Google Docs is not completely accessible. Learn more about Google Doc Accessibility. Some tips on using a Google file in your course (Force a user to make a copy and Create a preview/template)
Q: I’m assigned as a co-host and I can’t assign others as a co-host. Why?
A: Only the host can assign people as a co-host when you’re inside the zoom meeting. Host or the zoom meeting owner can add an alternative host when creating the meeting. Alternative hosts must be a PCC Zoom user (use their PCC email to add). If you received an error “someone@pcc.edu is not associated with a zoom account,”. Learn more about roles in a meeting.
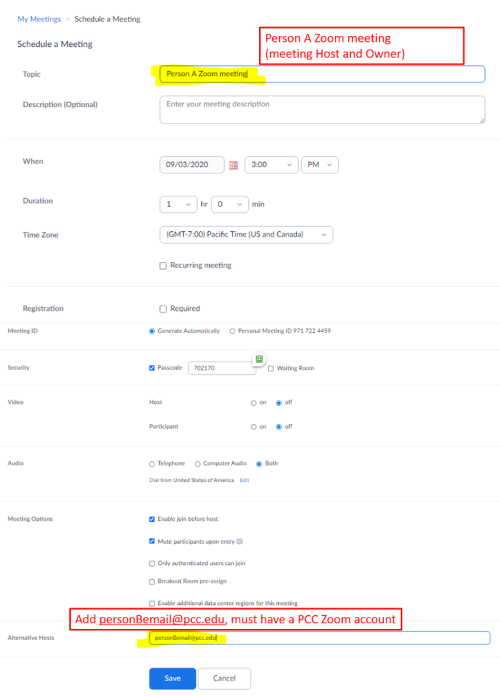
This doesn’t guarantee that person A (meeting owner) will be the host once A logs into the Zoom Client or Zoom and Starts the meeting. If person B is assigned as a co-host or alternate host, if person B logs into the zoom client and goes to the meeting prior to person A (meeting owner) joining the meeting, then person B will be the host, and person A will be the co-host. Person A can claim host inside the meeting if they wish to, then assign person B as a co-host inside the meeting.
Q: How many hosts and co-hosts can I have inside the meeting?
A: Only 1 host inside the meeting and unlimited co-host can be assigned. Learn more about roles in a meeting.
Q: When I do share the screen, I can’t find my meeting control anymore. Where do I find it?
A: When you share your screen, the meeting control is hidden at the top of the window. Try to put your mouse at the top of the screen that you’re sharing and it will reveal the meeting control.
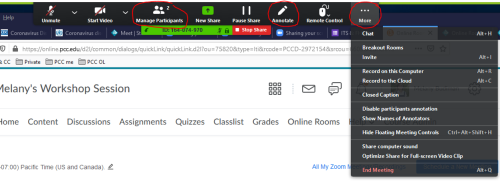
You can also change this setting to make the Meeting control always visible.
Sign in from the PCC Zoom website (portlandcc.zoom.us), click Settings on the left and choose In Meeting (Basic). Turn on the option for “Always show meeting control toolbar.”
Q: I want to audio transcript or caption on my recording. How do I create it? When will the audio transcript become available?
A: Unfortunately, if you didn’t check the box to have Audio transcript on the cloud recording’s setting prior to having your meeting or recording it, you can’t go back and expect to have the audio transcript available. Once you have it available for your cloud recording, you can edit the transcript.
You should receive an email when the audio transcript is available, and it may not be right away after your cloud recording becomes available.
Zoom tutorial on using audio transcription for cloud recordings. Learn how to edit your audio transcript (which is the same thing as the cc button on the player), access your recording and audio transcript from the PCC Zoom website (portlandcc.zoom.us).
Q: My cloud recording doesn’t include chat. How do I include that in the recording?
A: Unfortunately, if you didn’t check the recording setting prior to having your meeting or recording it, you can’t go back and expect to have it available.
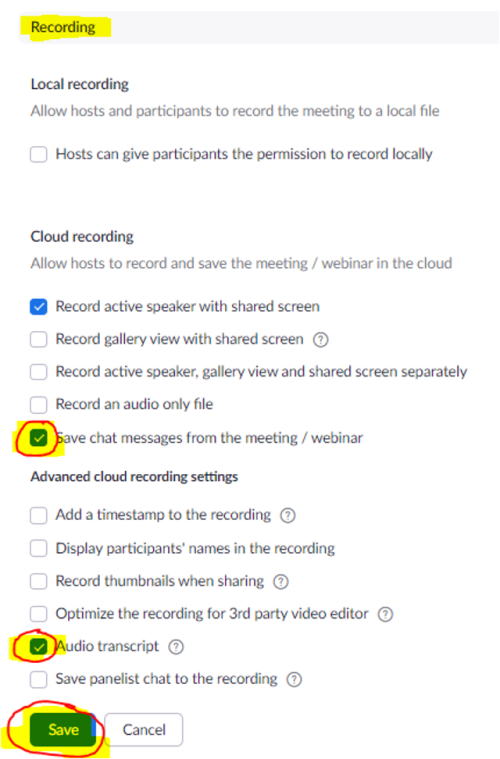
- Go to the PCC Zoom website (portlandcc.zoom.us)
- Click on Settings on the left and click on Recordings at the top tab
Check the box for “Save chat messages from the meeting / webinar” and “Audio transcript” and click the Save button
Q: I saved zoom recording locally and it failed to convert to mp4 or it doesn’t give me the mp4 video file.
A: Meeting recordings consist of raw Zoom files, converted video files, and plain text chat logs; the chat recording and main meeting recording are separate. The easiest way to ensure that all parts of the meeting are backed up is to back up the recording folder itself.
Meeting recordings are converted from raw Zoom files to MP4 video files automatically. To manually convert a recording, double-click the file named double_click_to_convert_01.zoom, and the Zoom client will convert the file to MP4 video.
If it still fails to convert the file, follow this guide to manually convert local recordings or as a last resort, send the recording to Zoom support have it converted. Follow this guide Option 3 to make sure your zoom client is the latest version.
If all fails, you will need to submit a report support ticket to zoom. Sign In using SSO, enter portlandcc for the company domain, sign in with your PCC username and password. You will need to fill out the information, such as:
- Subject: failed conversion of local recordings
- Description: add your meeting ID, date & time of the meeting. Would like to get the mp4 file of the recording.
- Priority: Normal
- Device: choose what device you used when you recorded the zoom meeting
- Attachments: don’t forget to attach your recording file. If the file is too big, you may need to upload it to your Google Drive and share it, then add the link in the Description.
Q: Can I access and use Zoom outside of D2L Brightspace?
A: Yes, you can access and use zoom outside of D2L Brightspace by going to PCC Zoom website (portlandcc.zoom.us) and signing in with your MyPCC username and password.
Q: Is my Zoom account a basic or Pro account?
A: If you’re a faculty or staff, you will have the Pro accounts. We have a basic account for students to do their group work for some classes. If you would like to have your students have a basic zoom account so they can create their own group meeting and record them, send your request to the dlhelp@pcc.edu with CRN and class information.
Q: What’s the difference between the basic and pro account?
A:
| Basic | Pro |
| Host group meeting up to 40mins if more than 2 people in the meeting | No time restrictions on the length of the meetings |
| Host up to 100 participants | Host up to 300 participants |
| Can only record to the local computer | Can record to the local computer or to the cloud |
| Unlimited number of meetings | Unlimited number of meetings |
| Group collaboration features, Security, Screen share | Group collaboration features, Security, Screen share |
| Custom personal meeting ID (PMI) |
Q: Can I start a Zoom meeting and then leave while others continue?
A: If you are a “pro” user (PCC Zoom account for faculty and staff are pro account) and give a “basic” or participant user host control, the meeting will continue to run for an unlimited time as long as you didn’t choose “End the meeting for All” when you leave the meeting.
However, if you are a “basic” user and give a “pro” user host control, the meeting will remain as a 40-minute limit duration and will end after 40 minutes from the time it started.
Q: I am teaching at another institution and also have a zoom account there. How do I make sure that I use the correct zoom account to have my class session?
A:
- Go to the PCC Zoom website (portlandcc.zoom.us) and Sign in with your MyPCC credentials.
- Then open your Zoom client app and follow this guide Option 1 to Sign In and Option 2 to Switch Account (if needed).
Q: How do I make sure that I have the latest version of the zoom client?
A:
- Follow this guide Option 3 to update your zoom client to the latest version.
Q: What should I do when my zoom application does not behave like normal. It kept crashing on me or I started getting a lot of prompts to allow zoom.exe to run on my computer or my device?
A: Most likely something happened to your zoom client application. You will need to uninstall your zoom client first and install the correct application.
- Follow this guide at the bottom of the page to learn how to delete/ uninstall and reinstall zoom.
Q: I can’t screen sharing in Zoom and I’m using Mac OS.
A: Follow this guide to update the screen sharing:
- Using the Zoom Client and Zoom Rooms with macOS
- Screen sharing on MacOS Catalina
- Turn Mac screen sharing on or off
Q: I thought I recorded my zoom meeting to the cloud (cloud recording) but I still haven’t received any email to inform me that it’s done or cloud recording is not there.
A: If you can’t find the cloud recording from the PCC Zoom website (portlandcc.zoom.us) under Recordings or if you don’t see your cloud recording in your course under Zoom → Cloud Recordings tab, then it’s possible that you choose to record it to your computer.
Step 1: Use the search function or finder (on a Mac) on your computer and search for “zoom.” By default, Zoom will create and point to a folder within Documents/Zoom with the title of the Room that you recorded in. You can alternatively select a different area to save the recording if you wish, though keep in mind that our instructions are based on using the default Zoom folder.
Zoom provides you with multiple files within this folder:
- The .mp4 will include any screens or video that were displayed in the room while recording.
- The .m4a file will provide just the audio that was recorded in the room.
- The .m3u file can be disregarded unless you had a recording that was saved in multiple parts (using the pause function located in the Zoom toolbar while recording).
Step 2: Upload media to our streaming server (Kaltura)
If you need to make any editing to your video, you can do that after you upload the video to Kaltura MyMedia. You can trim and clip a part from the beginning or the end, or chop and splice a section in the middle of your media, like an intermission or a technical glitch. You can also add Zoom in/out and Fade in/out for video effect. Here’s how to upload your media to Kaltura. Learn the steps to edit your media using the Video Editor.
Step 3: Follow Option 1 and Option 1a: Adding video and other media to your course
Note: Remember if you are planning to copy this course into another course, don’t forget to delete the content you just created to comply with FERPA.
Q: Should I check the box to “only authenticated users can join” when I create the zoom meeting?
A: We do not recommend you use this option if you create a zoom meeting for your class in D2L Brightspace Zoom. Authenticated users mean the people who will attend your zoom meeting already have a Zoom account, (can be a PCC Zoom account or their personal zoom account). Most PCC students do not have a PCC Zoom account as they are usually just attending a zoom meeting, thus, not required to have a zoom account. If you use this option, your students may not be able to join your zoom meeting if they don’t have a zoom account.
When you create the zoom meeting inside the D2L Brightspace Zoom, it’s already a secure place and your students will need to go there to access the zoom meeting. Adding more layers of security, such as enabling Waiting Room and/or using Meeting Password (Passcode) will be recommended.
If you set your meeting with “only authenticated users can join” then they will be prompted with the following screen to sign in first before they can access the zoom meeting:
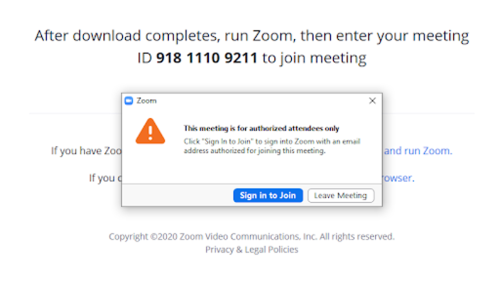
Follow the instructions on how to sign in to the Zoom client (Option 1) if they have a PCC Zoom account.
Q: I’m creating a zoom meeting now, does it automatically create the new version?
A: Zoom is an individual application that you install on your device (computer, tablet or phone). Creating a meeting doesn’t reflect the version of a zoom application. You will need to update your zoom client to the latest version to use it to start a zoom meeting. Follow the Zoom Client Guide tutorial to learn how to update your zoom client.
Q: Where should I create my zoom meeting, inside D2L Brightspace Zoom or on the PCC Zoom website?
A:
- If you are teaching a D2L Brightspace class, you should create your meeting inside D2L Brightspace Zoom. The links will be available automatically for your students as they access them from inside the D2L Zoom or calendar events. The link is accessible for all students inside the class.
- If you’re teaching more than 1 class, create the zoom meeting inside that specific class so that your student from class B won’t be able to access the zoom meeting you created in class A, even though you can see all the zoom meetings you created inside the D2L Zoom. You shouldn’t create the meeting prior to copying the content from one course to another.
- If you are not teaching any D2L courses, or want to have virtual office hours for multiple classes, or 1-1 time with your student, then you will create the zoom meeting outside of D2L Brightspace. The meetings created inside D2L Brightspace Zoom will be visible inside the PCC Zoom website (portlandcc.zoom.us), under Meetings, but not vice versa. If you created the zoom meeting from the PCC Zoom website, you will need to provide the meeting link to your attendees.
Q: Can I hide participants’ names during the zoom meeting or inside the Breakout Room?
A: No. You can’t hide participants’ names during the meeting, but you can change the settings of the recordings to hide the participants name. You will need to do this prior to your meeting. You can go to PCC zoom website (portlandcc.zoom.us), then go to settings on the left and under the recordings tab, unchecked box for “displaying participants’ names in the recording.”
Q: I would like to do a zoom webinar and not a zoom meeting. How can I do that?
A: Here’s a zoom meeting and webinar comparison to learn if you really need to use a zoom webinar. We only have a limited license for a Zoom webinar and you will have to submit the request through the media production request form.
Q: I received this error message “You cannot log into your Zoom account using this method. Contact your IT administrator for instructions. (2,025)” when trying to sign into Zoom. What do I do?
A: This occurs when trying to sign into PCC zoom website (portlandcc.zoom.us) or inside the Zoom Client using Google authentication or other ways. Follow this guide Option 1 to Sign In with SSO.
Q: When I’m in the zoom meeting, I do not see the option to “share screen” using the iPhone/iPad?
A:
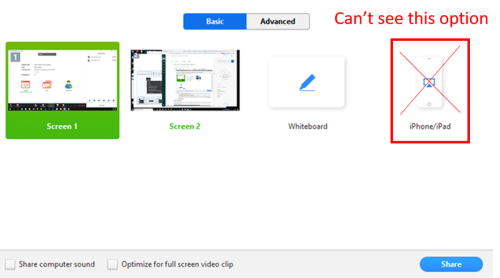
Check and make sure you meet the “Prerequisites” to be able to share screen with iPhone/iPad.
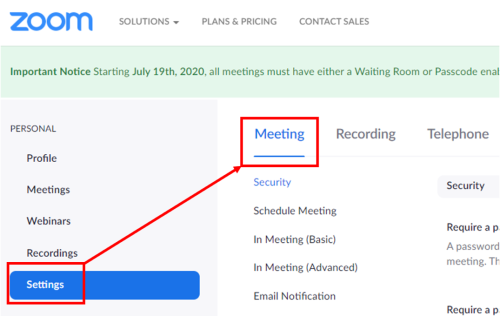
Go and sign into the PCC zoom website (portlandcc.zoom.us) then click on Settings on the left side. In the Meeting tab, click on In Meeting (Basic) and make sure the option for “Disable desktop/screen share for users” is OFF.

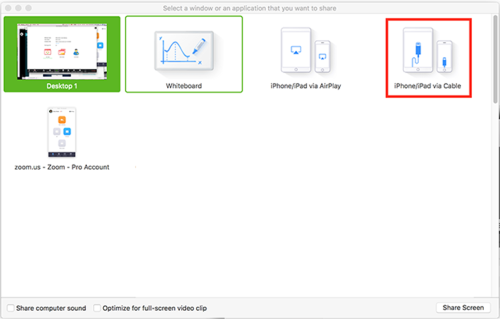
Q: When I’m in the zoom meeting, I do not see the option to “share screen” using the iPhone/iPad via Cable?
A: Check and make sure you meet the “Prerequisites” to be able to share screen with iPhone/iPad via Cable. Sharing with a wired connection is only possible on Mac.
Q: I do not see a Personal Meeting Room in my Zoom or in Brightspace course Zoom. What do I do?
A: Check your Zoom account settings:
- Go to the PCC Zoom website (portlandcc.zoom.us) and sign in with your PCC credentials.
- Click on Settings→ Schedule Meeting, make sure that you turn on “Enable Personal Meeting ID.”

If you still can’t see the Personal Meeting Room, please send an email to dlhelp@pcc.edu and let us know your PCC email address and your issue with not being able to see the Personal Meeting Room in your zoom.
Q: I can’t sign in to the PCC zoom website (portlandcc.zoom.us). I just change my PCC password.
A: Unfortunately, if you just change your password, you won’t be able to sign in to Zoom right away and have to wait until the next day around 5:00 am-ish when the CAS login (SSO account) syncs in.We won’t be able to manually or temporarily change your Zoom password because we’re using SSO authentication.
If after the next day you still can’t logs into the PCC Zoom website, try to refresh your browser:
- Windows: Ctrl + F5
- Mac/Apple: Command (⌘) + R
If this doesn’t resolve the issue, clearing your browser cache is the next step:
If you have difficulty with logging in we suggest that you attempt to reset your PCC password by using the self-service password recovery system. If you continue to experience issues, please reach out to IT Service Desk at 971-722-4400 for assistance.
Q: I created a zoom meeting and want to add another faculty or staff as a co-host or alternative host, but I can’t. I received an error “someone@pcc.edu is not associated with a zoom account.”
A: If you can’t add another staff or faculty to your zoom meeting using their PCC email address, it means that either that person does not have a PCC Zoom account or they’re using their PCC email and have a Zoom account that is outside our PCC Zoom organization account. That person can still use their Brightspace course Zoom to create a meeting and join a zoom meeting inside the Brightspace class.
If you would like to transfer their zoom account to PCC Zoom account, then send an email to dlhelp@pcc.edu and let us know your PCC email address and a note to let us know you would like to join our PCC Zoom account.
To add another faculty or staff as alternative host:
- Edit your zoom meeting
- In the Alternative Hosts, add their pcc email address separated by a comma

- Click on the Save button. You should be able to see their email listed now

- They would then need to login to the Zoom (follow Option 1 in the Zoom Client Guide)
Q: I would like to use virtual background in my zoom meeting. How do I do that?
A: Note:
- Make sure your computer meets the system requirements for Virtual Background.
Step 1: Go and sign into the PCC zoom website (portlandcc.zoom.us) then click on Settings on the left side. In the Meeting tab, click on In Meeting (Advanced) and make sure the option for “Virtual background” is ON.
Step 2: Go and sign into your Zoom Client App (Option 1). Click on your profile photo (top right) and select Settings. Select Virtual Background and make your changes. Learn more about Virtual Background.
Q: I want to join more than 1 zoom meeting. Can I do that?
A: Yes. The feature to join multiple meetings simultaneously from the Zoom desktop client allows participants to participate in or monitor multiple meetings at the same time.
Note:
- This feature doesn’t allow you to host multiple meetings at the same time.
- This option is only available on the desktop computer.
Step 1: TURN ON settings
- Sign in to the PCC zoom website (portlandcc.zoom.us)
- Click on Settings on the left side
- Under In Meeting (Basic), turn ON “Join different meetings simultaneously on desktop.”
Step 2: Join multiple meetings on desktop
To join multiple meetings simultaneously, you can join the first meeting by:
- Click the Join button in the Zoom desktop client
- Click the join URL OR
- Navigate to https://zoom.us/join and enter the meeting ID.
Note: For each additional meeting you want to join, you will need to navigate to the join URL in your browser and the Zoom client will automatically launch the meeting.
Learn more about how to join different meetings simultaneously on the desktop.
Q: I have a cloud recording. How do I know who has watched the recording?
A: All your cloud recordings (from Zoom in D2L Brightspace class or from the PCC zoom website (portlandcc.zoom.us).
- Sign in to the PCC zoom website (portlandcc.zoom.us)
- Click on Recordings on the left side
- Click on the recording topic name link
- Click on the Recording Analytics link
- You can see a Summary of your cloud recording that has dates, how many times it has been viewed and the graph. You can also switch it to By View, where you can see the date and who has viewed it. In the By Download tab, unless you allow the viewer to be able to download the recording (which is OFF by default), you probably won’t see any data.
Note: If it’s a recording from D2L Brightspace Zoom, you may not be able to see the students’ names who have watched the recordings since they need to access it from inside the course. If the recording is posted on the public site and the viewer do not need to sign in to watch it, then you won’t be able to track who has watched the recording, it will only state “Guest.”
Learn more about zoom recording analytics.
If you really want to keep track of who has watch your cloud recording, you will need to change the setting
set the cloud recording to only allow authenticated users to view it. I think this may work as it will allow anyone who wants to watch the recording to login to zoom, whether it’s using their personal one or PCC zoom.
- Go to the PCC Zoom website
- Click on Recordings on the left menu
- Click on the files link
- Click on the Share button on the right
- Choose “Only authenticated users can view: Signed-in users in my account” Click the Save button and click Done. (Don’t change anything else here as we don’t want to add more complicated ways for students to access the recording, we only want to be able to record who’s watching the recording at this time)
- Then you will need to wait until you get some data from people who are watching your cloud recording.
Q: I have someone outside of PCC (volunteers, interns, or teaching assistants from other institutions, etc.) who needs access to my D2L course and zoom. How would I do that?
A: We had a couple similar requests come in that were asking for non-pcc users to have access to PCC managed resources and/or student information. We’ve met with IT and Information Security to see how best to handle these to the college’s guidelines and think we have a recommendation.
In the case of your program, since the volunteers are not college staff but want to use our technology, your Division Dean has to submit an Affiliate Access Request form (can be accessed from MyPCC) for them.
If you have many people that need access, you can actually work directly with the IT service desk to submit a bulk request. If this is the case, please contact Matthew Brehm directly (matthew.brehm15@pcc.edu) and include that you want MyPCC and Zoom accounts in the request.
Q: I have 2 sections of the same course cross-listed into a single D2L shell. Will online Zoom meetings I schedule show and be available for both CRNs?
A: Yes, because the 2 courses are now combined into one course, when you create a zoom meeting, it will be available for all the students in the class. You don’t need to do anything as they can access it within the course.
Q: I would like to record my screen with a gallery view. How can I do that? What actually gets recorded in zoom?
A: Step 1: Change your Zoom settings from the PCC zoom website (portlandcc.zoom.us)
- Sign in to the PCC zoom website (portlandcc.zoom.us)
- Click on Settings on the left side
- Click on Recordings on the top tab
- Unchecked “Record Active Speaker with Shared Screen”
- Check the box for “Record Gallery View with Shared Screen”
- Click the Save button.
Step 2: Read the instructions on Zoom support about Recording layouts. In the scenario of recording shared screen with gallery view layout for cloud recordings is not supported. So you may try to record it locally to your computer. Learn what gets recorded in Zoom?
Step 3: Record locally to your computer and upload it to your Google Drive if you want to share it with others. Follow the instructions to learn about zoom local recording.
Q: I would like to use PowerPoint as a virtual background when I record my lecture in Zoom. How do I do that?
A: Watch Eric Dodson’s video, a faculty who created a demo of using a PowerPoint background in his Zoom recording, after the past week update on the Zoom Client (the application that you installed to your computer when you’re using the zoom meeting). Thank you Eric for creating and sharing your demo with us!
Follow this guide (Option 1 and 3) to update your Zoom Client. Watch this video to learn how to use the latest Zoom meeting features:
- Slides as a Virtual Background
- Adjust your Lighting & Touch up my appearance
- Set the amount of background noise suppression
- Add video filters
- More meeting reactions
Q: I’d like to be able to assign someone to schedule a meeting on my behalf. How do I do that?
A: Requirement: both you and the other user must have a PCC Zoom account. More information on schedule privilege in Zoom.
Step 1: Set up scheduling privilege in your Zoom settings from the PCC zoom website (portlandcc.zoom.us)
- Sign in to the PCC zoom website (portlandcc.zoom.us)
- Click on Settings on the left side
- Under Other, click the plus sign (+) next to Assign Scheduling privilege to
- Enter one or more email addresses in the window, separated by a comma
- Click on the Assign button
If the user was assigned successfully, they will appear under Assign Scheduling Privilege to. They will need to sign out of the PCC Zoom website and/or Zoom client app and sign in again before they will be able to schedule the meeting for you there.
Step 2: Scheduling for another user
- Follow this tutorial about ¾ down the page to learn how to schedule a Zoom meeting for another user.
Step 3: Do I automatically have a host control if I create the meeting?
That setting only allows someone to schedule the meeting on behalf of another person, but doesn’t guarantee anything. Everyone would have to also check other settings.
There are several requirements:
- To become a host in the meeting, whoever owns the meeting, needs to sign in to the Zoom Client Guide or Zoom (inside D2L course) and then
- Start the meeting from there.
If person B scheduling a meeting for person A, then person A is the owner of the meeting. It doesn’t make person B a co-host or host in person’s A meeting. If person B needs to be a co-host in person’s A meeting, then when person A or B created the meeting, they would need to add an alternative host. Learn more about roles in a meeting.
This doesn’t guarantee that person B (meeting owner) will be the host once B logs into the Zoom Client and Starts the meeting. If person A is assigned as a co-host or alternate host, if person A logs into the zoom client and goes to the meeting prior to person B (meeting owner) joining the meeting, then person A will be the host and person B will be the co-host. Person B can claim host inside the meeting if they wish too, then assign person A as a co-host inside the meeting.
Q: How do I add a waiting room to my meeting?
A: If you create the meeting in D2L Brightspace Zoom class
- Go to your D2L Brightspace class
- Go to Zoom from the course navbar
- Click on the “meeting name”
- Click on the Edit this Meeting button
- Check the box for “Waiting Room”
- Click the Save button and confirm
If you create the meeting from the PCC zoom website (portlandcc.zoom.us)
- Sign in to the PCC zoom website (portlandcc.zoom.us)
- Click on Meetings on the left side
- Click on the Edit button next to the meeting’s name. If the meeting is a recurring event, it will ask you if you want to edit just this one or all occurrences.
- Check the box for “Waiting Room”
- Click the Save button
Q: How do I customize the message in the Waiting Room?
A: Requirement: you will need to enable a waiting room in your zoom meeting. Be aware that this setting will affect all your zoom meetings!
Step 1: Change your Zoom settings from the PCC zoom website (portlandcc.zoom.us)
- Sign in to the PCC zoom website (portlandcc.zoom.us)
- Click on Settings on the left side
- In the Security, under Waiting Room Options, click on Customize Waiting Room link
- Click the Edit button (pencil icon) next to the title or description that you want to change
- You can change the title up to 64 characters and the description up to 400 characters. Click on the check button to save your changes.
- Click the Close button to go back to the Settings
Q: How do I add my Zoom meeting to the Google Calendar?
A: Requirement: Make sure you are using Google Chrome since you will need to add it to the Google Calendar. This works for a zoom meeting created in the D2L Zoom.
Note: If you use the “Add to Google Calendar” when you created the zoom meeting from inside the D2L Zoom and give you an error message “Access restricted, no privilege to do this action. (200).”
And even if you go to the PCC Zoom website and find that same zoom meeting you created from D2L Zoom and tried to add to the Google Calendar, you will get an error message “Oops! We were unable to complete your request. Please try again. (300).”
You will need to reinstall the Zoom for Google Calendar add-on. Click on the Install button and follow the prompts to finish adding the add-on.
Step 1: Install the Zoom Add-on for Google Calendar
- Download and install the Zoom add-ons for Google Calendar
- Follow the instructions (use your PCC credentials to access)
Step 2: Schedule a zoom meeting
You should now be able to add the zoom meeting to your Google Calendar wherever you schedule the zoom meeting (from D2L Zoom, the PCC zoom website (portlandcc.zoom.us, or the Zoom Client). You can also schedule a zoom meeting from inside your Google Calendar(use your PCC credentials to access).
Q: How do I know when someone is entering or leaving the zoom meeting? How should I use the waiting room?
A: You can set an alert to your zoom meeting, by turning on the sound notifications and this will affect all your zoom meetings. Part of zoom security is to create your zoom meeting using a passcode and/or waiting room.
Change your Zoom settings from the PCC zoom website (portlandcc.zoom.us)
- Sign in to the PCC zoom website (portlandcc.zoom.us)
- Click on Settings on the left side
- In the In Meeting (Basic), set the Play sound for sound notification when someone joins or leaves to Host and co-host only
- You will hear a chime when someone enters or leaves your meeting. You will also hear the chime when someone is in the waiting room and you can let them in from the Participant window.
Waiting Room – Disable it inside the meeting?
If you enable the waiting room, and your meeting has started, you will need to admit any visitors who come afterward. It can be troublesome, but you can disable your waiting room inside your meeting:
- Click on the Security icon in your Zoom meeting
- Uncheck the option for “Enable Waiting Room”
- Any visitors who come afterward will enter the room directly.
Q: How do I know when someone is entering or leaving the zoom meeting? How should I use the waiting room?
A: You can set an alert to your zoom meeting, by turning on the sound notifications and this will affect all your zoom meetings. Part of zoom security is to create your zoom meeting using a passcode and/or waiting room.
Change your Zoom settings from the PCC zoom website (portlandcc.zoom.us)
- Sign in to the PCC zoom website (portlandcc.zoom.us)
- Click on Settings on the left side
- In the In Meeting (Basic), set the Play sound for sound notification when someone joins or leaves to Host and co-host only

- You will hear a chime when someone enters or leaves your meeting. You will also hear the chime when someone is in the waiting room and you can let them in from the Participant window.
Waiting Room – Disable it inside the meeting?
If you enable the waiting room, and your meeting has started, you will need to admit any visitors who come afterward. It can be troublesome, but you can disable your waiting room inside your meeting:
- Click on the Security icon in your Zoom meeting
- Uncheck the option for “Enable Waiting Room”
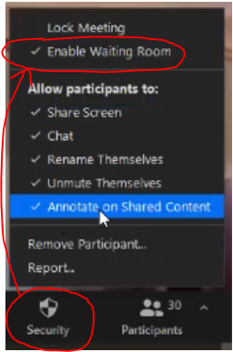
- Any visitors who come afterward will enter the room directly.
Q: I don’t want to see myself when I’m presenting, but I want all participants to be able to see my video. How do I hide myself?
A: Hiding or showing my video on my display
If you’re the meeting host, you will need to click on the … (3 dots) next to your own display and choose Hide Self View. To reset your own display, click More at the corner of the gallery display and choose Show self view.
Q: What’s the differences between pinning videos vs. spotlight videos?
A: Pinning videos (personal view) vs. Spotlight videos (everyone can see)
You can pin video up to 9 specific people. It is your personal setting. It will also only record the pinned videos if you are recording locally (to your computer). Pinning another participant’s video will only affect your local view and local recordings, not the view of other participants and will not affect cloud recordings.
With spotlight, you can spotlight up to 9 videos. Requirements: you can only spotlight people who are using their webcam at the time you set that person as a spotlight. This view will affect everyone in the meeting if you’re the meeting host. It may not work if you’re the only one in the room.
Learn more about Recording layouts and find out what gets recorded in Zoom?
Q: How do I do self-select breakout rooms?
A: This is a new feature in the Updated release on September 21, 2020. Self-Select Breakout Rooms: The host can now create breakout rooms with the option for participants to self-select which breakout room they would like to join. If enabled, participants can move freely between breakout rooms without the host’s help. Both the meeting host and participants need to be on Client 5.3.0 or later to self-select Breakout Rooms.
When the host creates the breakout rooms, you can choose “Let participants choose room.” Participants will then see the More icon and be able to choose which breakout room to join. Participants can switch to different breakout rooms independently without the help from the meeting host. Learn more about managing breakout rooms.
Q: Disability Services has assigned a transcriber to a student in my Class. What do I need to do?
A: Please contact Disability Services (access-tech-group@pcc.edu or jennifer.lucas4@pcc.edu for online course tech help) for help in setting up your Zoom Meetings to meet the requirements of the Student.
Q: I would like to use zoom to proctor my exam. Can I do that?
A: Yes, you probably can as other institutions have done it. PCC currently does not use zoom for proctoring, but you can try it on your own. You can use breakout rooms to conduct proctor exams. Learn more about proctoring using Zoom from other institutions.
Q: When I go in and out of the share screen or using Breakout Rooms, I lose my Zoom window, can’t see the Participants and Chat window anymore. Can I fix this?
A: When you do share screen or use breakout rooms, the participants and chat window will automatically be closed, so you will have to re-open them again from the meeting control in zoom. There’s no settings to keep these open. You just need to find the Zoom icon on your computer taskbar to get back to the meeting and re-open those windows.
You can control the settings when someone does a share screen, so that it’s not a full screen mode. You can change the settings from your Zoom client app.
- Make sure that you sign in and update the zoom client to the latest version.
- Click on the top right icon where you see your photo or initial and choose Settings
- Under Share Screen, choose “Maintain current size” for Window size when screen sharing and you can adjust your application window size accordingly.
Q: I have a Windows 10S laptop and can’t install a zoom client or can’t do certain things in Zoom. How can I fix it?
A: If you have Windows 10S, you can only install software that comes from the Windows Store and they’re very limited and you won’t be able to find Zoom clients easily.
- How do I install Zoom when my computer is in S mode? This guide shows you how to switch out of S mode, but you will need to keep the standard version of Windows 10 and can’t go back to the S mode.
- How to use Zoom in Windows 10S mode? This guide shows you how to join the zoom meeting using your Edge browser, still in Windows 10S mode.
Q: I’d like to be able to show or play a video/audio during a zoom meeting. How do I do that?
A: When you’re in the zoom meeting, just do your regular screen share in Zoom and follow these recommendations below. Learn more about sharing your screen or content in zoom.
Recommendation:
- Share the Desktop (whole screen) and not just specific application or browser window
- Share computer sound is checked. If you check this option, any sound played by your computer will be shared in the meeting. Select the down arrow ˅ just to the right of the Share Sound option to view audio options and switch between Mono and Stereo (high fidelity) audio options.
- Optimize screen share for video clip is checked. Check this if you will be sharing a video clip in full screen mode. Do not check this otherwise, as it may cause the shared screen to be blurry.
If your video sharing quality is bad, you may need to change the zoom settings (see below). Please change the settings with some precautions. Remember that if you’re recording your meeting, it will record a big file and your students may not have the network bandwidth to be able to stay in the meeting. Streaming video requires you and your students to have strong reliable internet access.
- Sign in to the PCC zoom website (portlandcc.zoom.us).
- Click Settings
- Find Group HD video under “In Meeting (Advanced)” and turn it on. Make sure to click on the Save button.
If you are in the zoom meeting prior to changing the settings, make sure you leave and come back after saving the settings.
Q: How long can a zoom meeting stay idle?
A: According to Zoom guide on time limits for idle meetings, for PCC faculty and staff (pro licensed):
Meeting timeout at 30 hours
- 1 host, no participant
- 1 host, any number of participants
- 0 host, any number of participants (join before host)
Meeting timeout at 40 minutes
- 1 host and 1 or more participants joined. Only one person remains in the meeting. The meeting will end 40 minutes later if no one else joins.
For PCC students (Basic or free account):
Meeting timeout at 30 hours
- 1 host, no participant
- 1 host, 1 participant
- No host, 2 participants (join before host)
Meeting timeout at 40 minutes
- 1 host, 2 participants or more at the same time
- 0 host, 3 participants or more at the same time(join before host)
Q: How do I use Zoom Live Transcription?
Live Transcription provides robot transcription services, which enables speech to text transcription in Zoom Meetings and Zoom Webinars. This feature is enabled by the host of the meeting or webinar once it begins. Participants will not see the Live Transcript option unless the host enables it.
Notes:
- This feature is not available in Breakout Rooms or Zoom on Linux OS.
- This feature does not create subtitles in the Zoom recording. Subtitles only appear during the live meeting. Hosts who want subtitles to appear in the Zoom recording need turn on Zoom Audio Transcription.
Follow this guide to enable Zoom live transcription for Host and Participant.
Q: How do I use Zoom registration for my zoom meeting?
A: Note:
- This feature is not available if you have a recurring meeting that has no end time.
Follow this guide to set up registration for a meeting.
Q: How do I enter and share my preferred pronouns in my profile?
A: Note:
- Zoom has enabled entering and sharing your preferred pronouns in a separate profile field. Please do the following:
- Sign in to the PCC Zoom web portal
- In the navigation panel, click on your Profile pic and then click Edit.
- In the Pronouns field, enter your preferred pronouns.
- In the Share in a meeting or webinar? drop-down field, choose one of the sharing options.
- Click Save.
Q: How do I check attendance of past meetings (see past participants attending) in my profile?
A:
- Login in to https://portlandcc.zoom.us/
- Click on Reports, sort and Search by date range
- Click on Participants hyperlink number for the meeting and excel attendance report is generated
(NOTE: You can also check attendance via D2L Zoom by clicking on Previous Meetings, then the Reports button to the right of the meeting. Currently not working 7/28/2021
Q: Can I turn off passcodes requirements for Recordings?
A: Yes, you can turn off the passcode requirements for your course zoom recordings.
Note though that this has been turned on by default due to advisement by the cybersecurity and legal teams at PCC. This video makes it much easier for students to access Recordings with passcodes (the passcode is automatically copied when they click on the Recording and they just have to paste it on the next page).
Note: Please be aware that you should not share any videos with students in them outside of your class.
Q: Can I transfer Ownership of my Zoom meeting to someone else? (Not add them as Alternative Host, but actual Owner.)
A: Yes, go to your Google Calendar invite and click on it, then the three vertical dots at the top right, and then pick “Change Owner.” Put in the user’s PCC email address and it will transfer ownership to them.
Q: Accidentally removing a participant from a session and wanting to allow them to rejoin.
A: We have a global setting that doesn’t allow “Removed Participants from rejoining”.
If this happens in a class session and a user is accidentally removed there are two resolutions.
- If feasible, end the class Zoom session and have everyone rejoin. Zoom doesn’t treat the new “session” as the old one and the formerly removed participant can join.
- If not feasible to restart Zoom session, call FHD and we can briefly toggle the global security setting to allow formerly removed participants from rejoining. They can rejoin, and when we toggle it back, they will not be removed.
Q: Can I move my Zoom Cloud recordings to My Media Kaltura for longer use?
A: Yes, you can send a request form to get your Zoom cloud recordings to My Media Kaltura in bulk.
