Adding video or other media to your course
You can add links to video or media directly in the Content area, and it will be organized inside a weekly module, or you can embed video inside the Content page. If you need help with converting a video or deciding where to host your files, fill out the Media Project Intake Request form. Someone with expertise in your project will contact you and lead you through the process.
- What is required: A D2L Brightspace course and video or audio resource link or embed code ready to be added
Add a video or an audio (media) to your course
There are two ways to add a video or audio:
- Using the embed code on a page, students can access the media directly on the page.
You can easily use the media embed code anywhere in your course that has an HTML editor, such as Announcements, Content, Discussions, Assignments, Quizzes, etc. This guide only covers how to do it inside the Content area, but you can apply the same steps to other areas whenever you’re inside an HTML editor using the Insert Stuff icon. - Using the URL link, students will have to click on the link to access the media
Important Notes:
- If you run into any issues following these steps, please contact the Learning Technology Help Desk (971-722-8227, Email: dlhelp@pcc.edu)
- You can only see a list of videos that you’ve already uploaded to My Media or have access to in My Media. If you have not uploaded the video, follow the guide to upload the video to My Media
- If you are using Camtasia to record video and have captions, you will have to export the video as mp4 without the caption, and extract the caption file separately as a .srt file. Upload the video to My Media and email the caption file to dlhelp@pcc.edu with information about your video so that we can find your video and attach the caption.
Option 1: Embedding video to a new html page
These guides will show you steps to embed a video using the Insert Stuff icon and choose the video from My Media, Video Note, Films on Demand, YouTube, or by entering the embed code.
- Click on the Content link from the course navbar
- Select the module on the left side where you would like to add the media file
- Click on the Upload/Create button from within the module and select Create a File from the list

- Enter the title in the Enter a Title field, such as “Week 1 Reading”
- Inside the html editor area, click the place on the page where you would like the video to appear and click the Insert Stuff icon from the toolbar
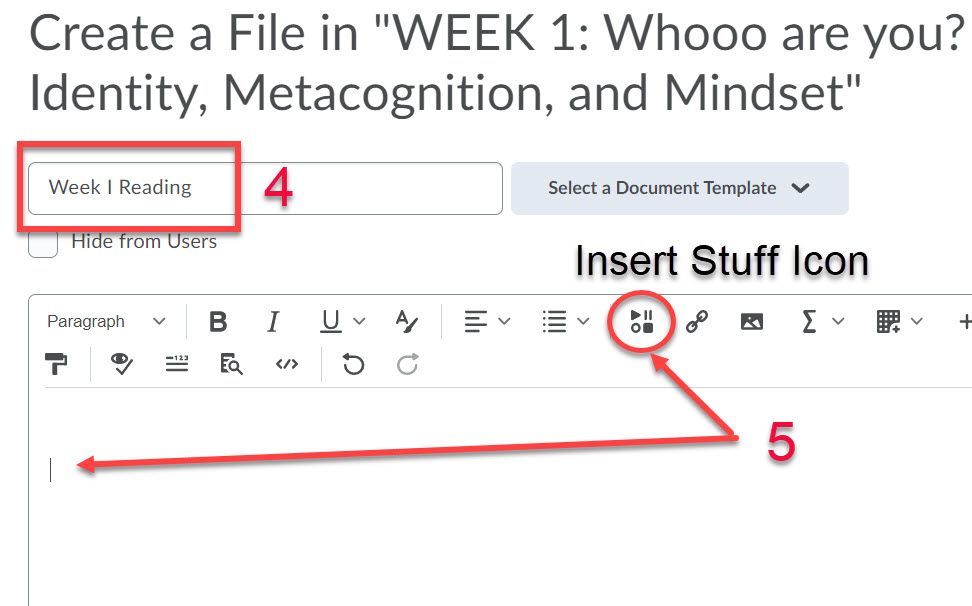
Content-create a File-insert stuff icon
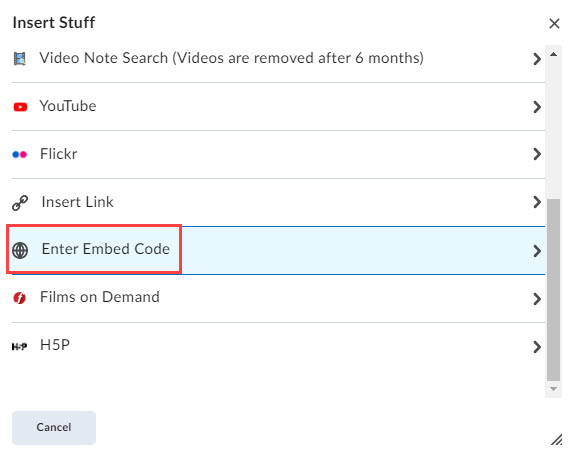
- The Insert Stuff window will open and choose between the following options:
Option 1a: Insert Stuff – My Media (Kaltura)
- The Insert Stuff window will open. Select Embed Kaltura Media Insert Stuff from the left area

- Find the video you want to add from the list and preview the video to make sure the video is the right one for you. Click on the </> Embed button next to the video title to choose.

- Click on the Insert button to confirm. You can click on the Back button if the video is not the right one and repeat the previous step

- Follow the next step outside of the Insert Stuff options
Option 1b: Insert Stuff – video Embed code
You can add a video or a video playlist using the embed code from other websites, such as YouTube. Here is a list of video sites that can use embed code: YouTube, Teacher Tube, Ted, Vimeo, Khan Academy, National Geographic, Discovery Channel, MIT Video, Howcast, Daily Motion, Influxis, etc.
- The Insert Stuff window will open. Select Enter Embed Code from the left area
- Copy the embed code of the video or the video playlist from a website, such as YouTube, and paste it into the Embed Code field. Click on the Next button

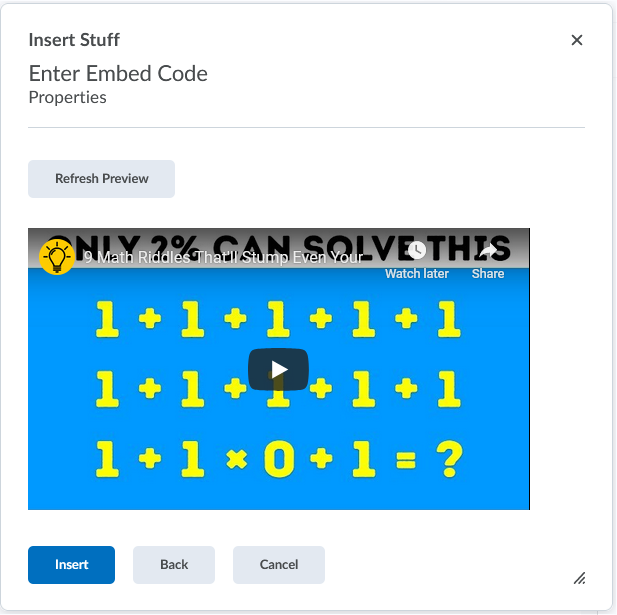
- You can preview the video. Click on the Insert button to confirm. You can click on the Back button if the video is not the right one and repeat the previous step
- Follow the next step outside of the Insert Stuff options
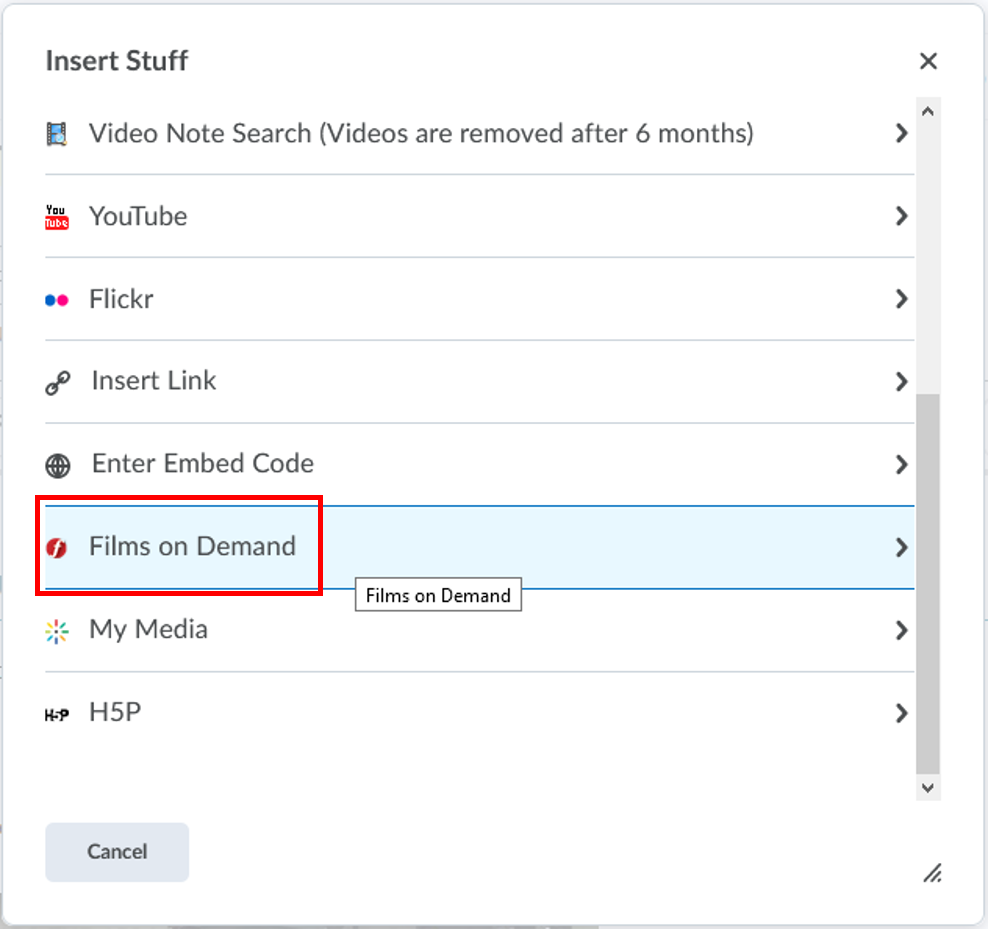
Option 1c: Insert Stuff – Films on Demand
Films on Demand is one of our video library resources that you can easily add to the course without having to convert the link first.
- The Insert Stuff window will open. Select Enter Embed Code from the left area
- Enter a keyword in the Search text box to find a video from the Films on Demand video collection and click on the magnifying glass button
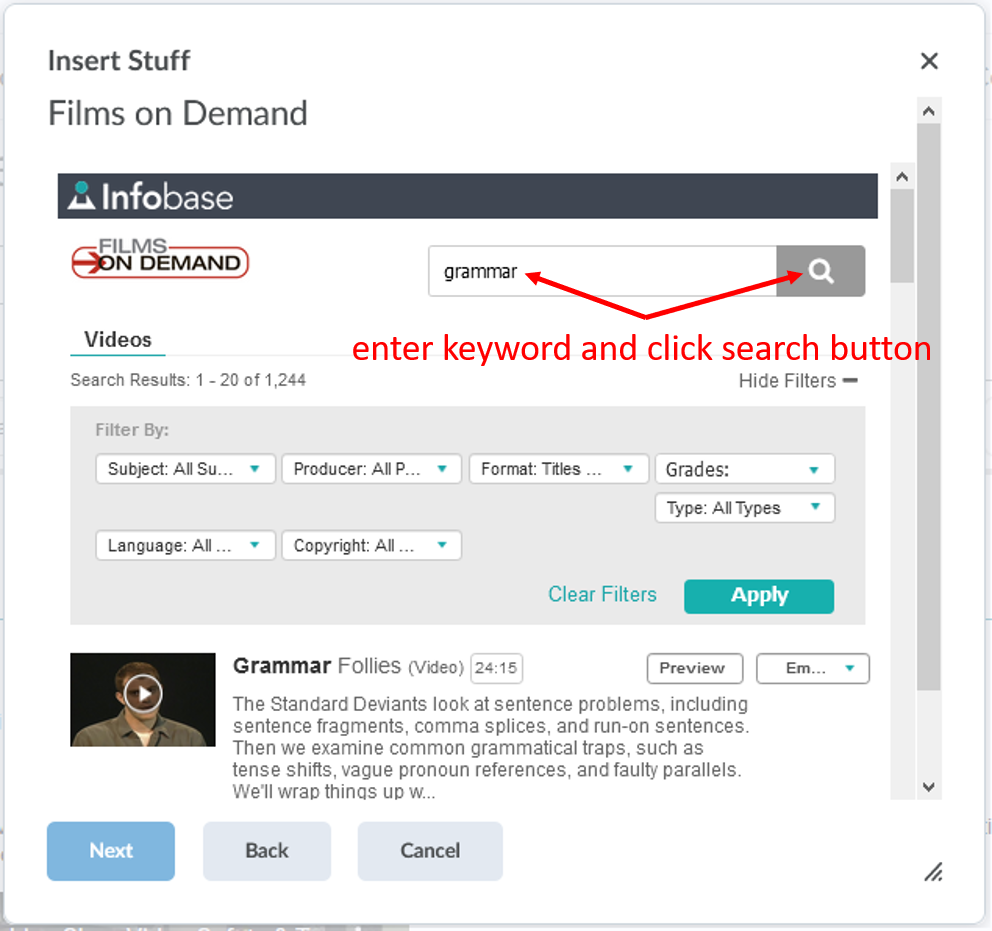
- Preview the video from the list by clicking on the video thumbnail. When you’re ready, click on the Embed button next to the video you want to add and choose either Embed Small or Embed medium. Don’t worry about the video size because you’re actually just adding the thumbnail and when your students play the video, they can still change the viewing in the video control to play it fullscreen
- Embed Small is 420 px width x 350 px height (Recommended choice #1)
- Embed Medium is 660 px width x 530 px height (Recommended choice #2)
- Embed Large is 885 px width x 698 px height (Not Recommended)
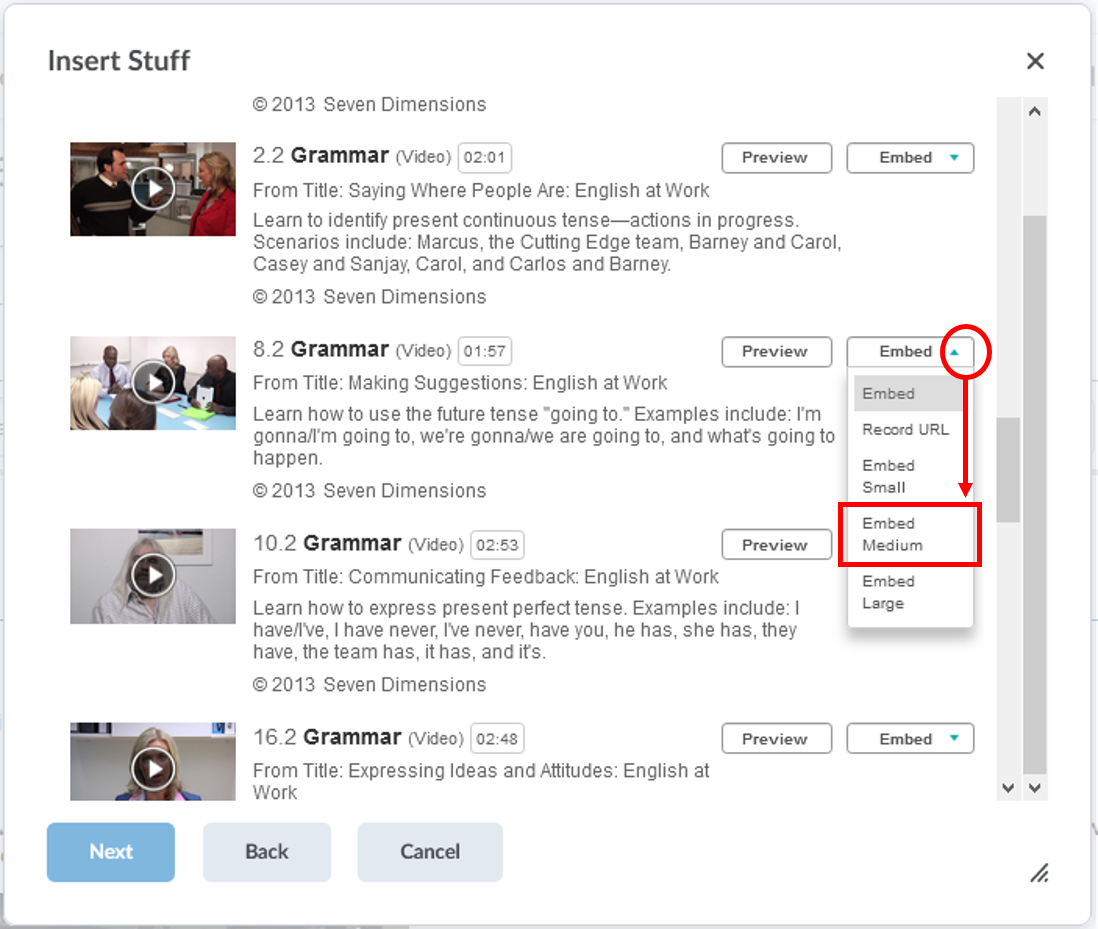
- It will show you the video thumbnail size (shows Embed medium below) and you can preview the video. Click on the Insert button to confirm. You can click on the Back button if the video is not the right one and repeat the previous step

- Follow the next step outside of the Insert Stuff options
Option 1d: Insert Stuff – Video Note
Video Note is one of the options to quickly create a video or an audio recording within D2L Brightspace. The video will be removed after 6 months. If you want to keep media for more than 6 months, create it using Kaltura Capture instead.
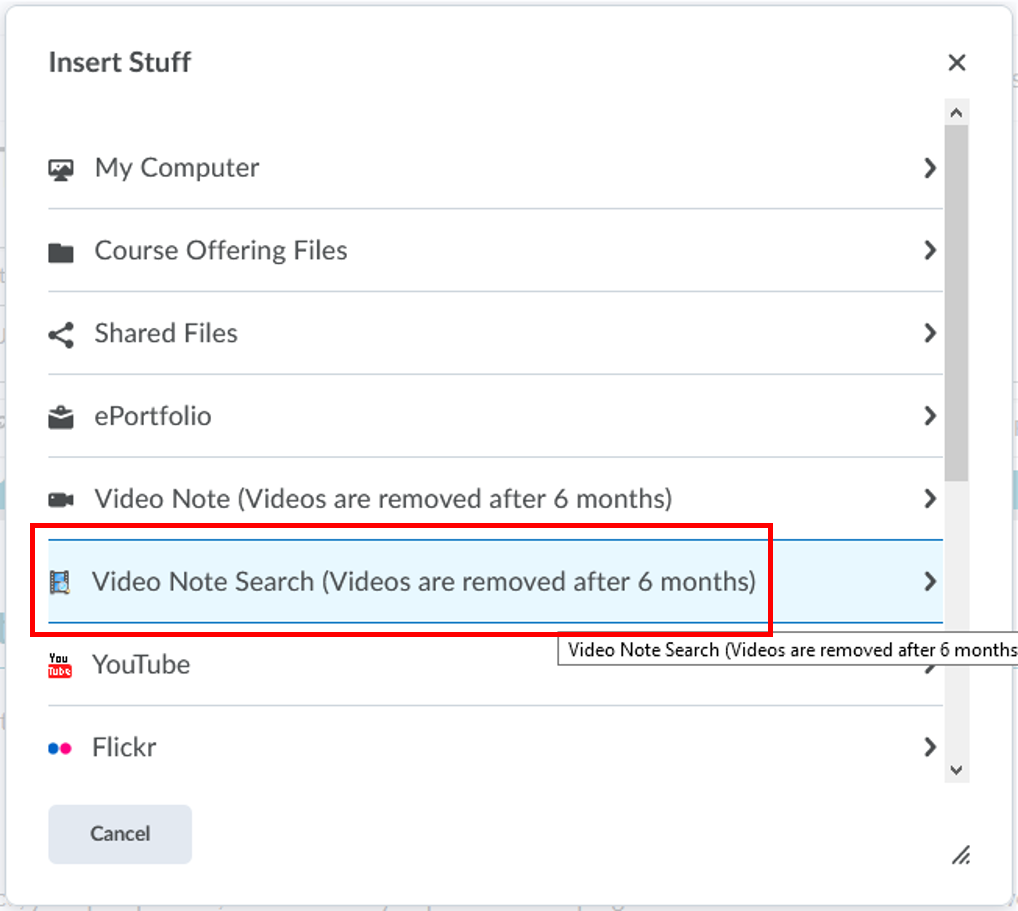
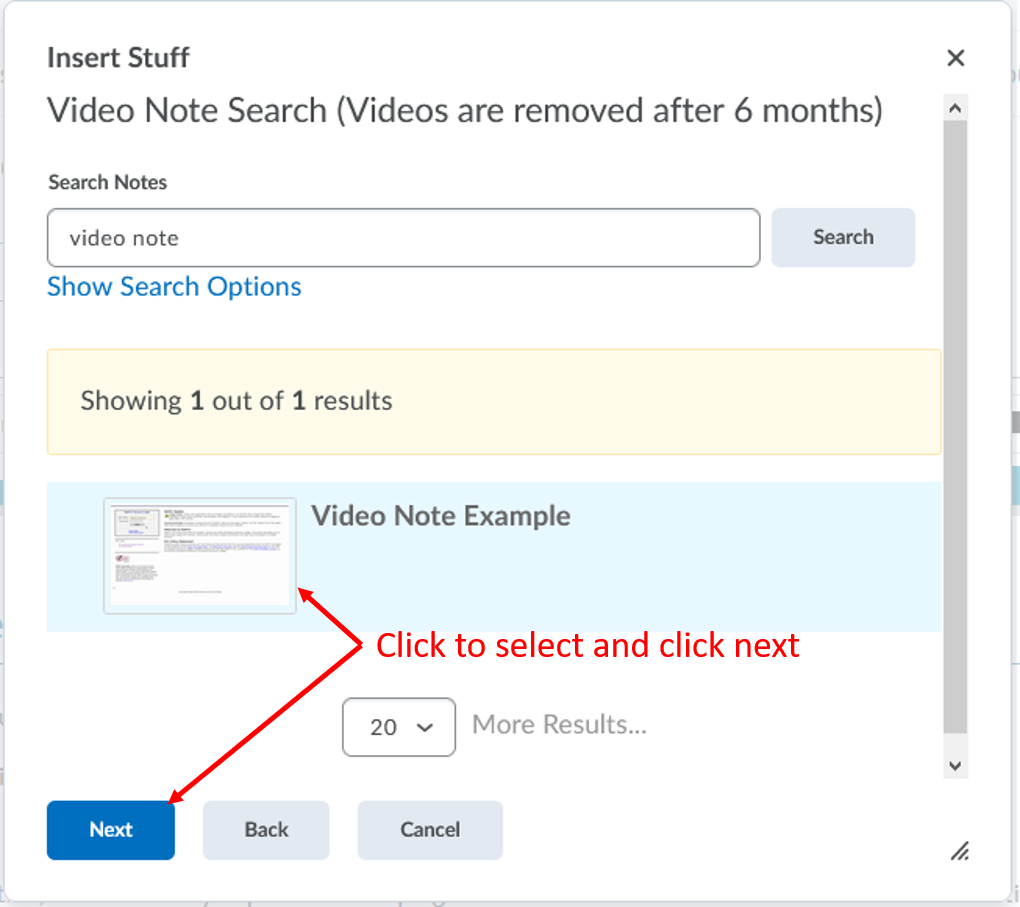
- The Insert Stuff window will open. Select Video Note Search from the left area
- Enter a keyword in the Search text box to find a media from your video note collection and click on the Search button
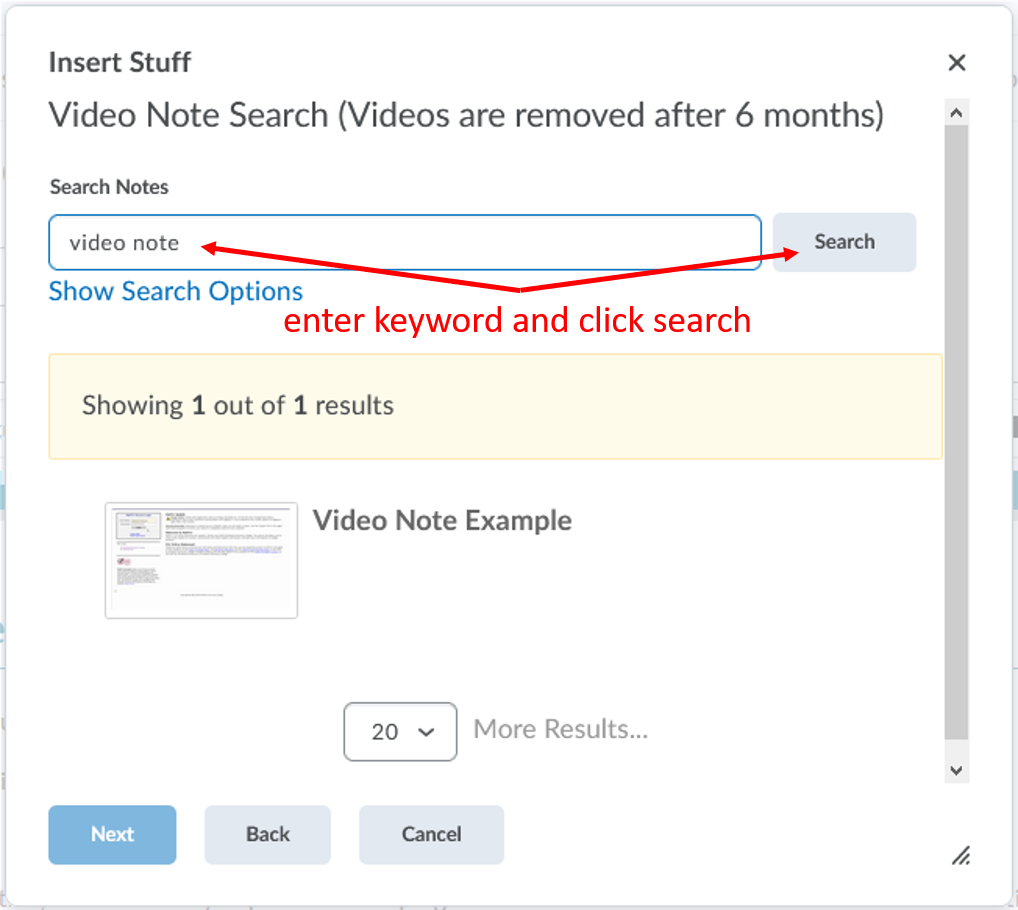
- Click on the video note you want to add and click on the Next button
- You can preview the video. Click on the Insert button to confirm. You can click on the Back button if the video is not the right one and repeat the previous step
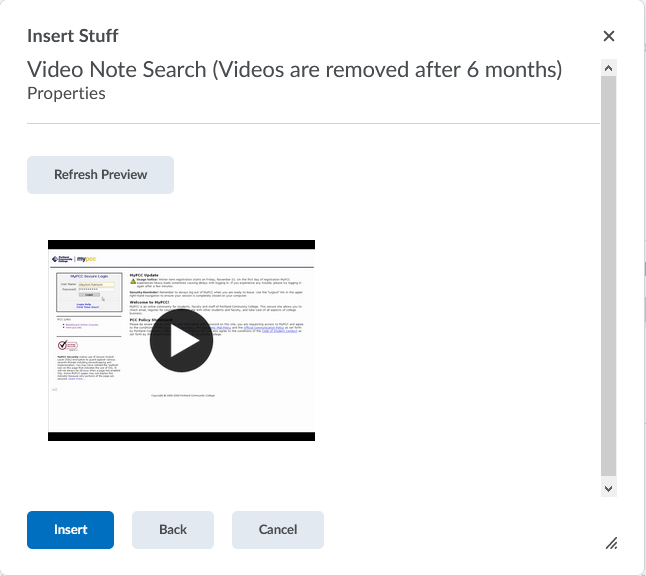
- Follow the next step outside of the Insert Stuff options
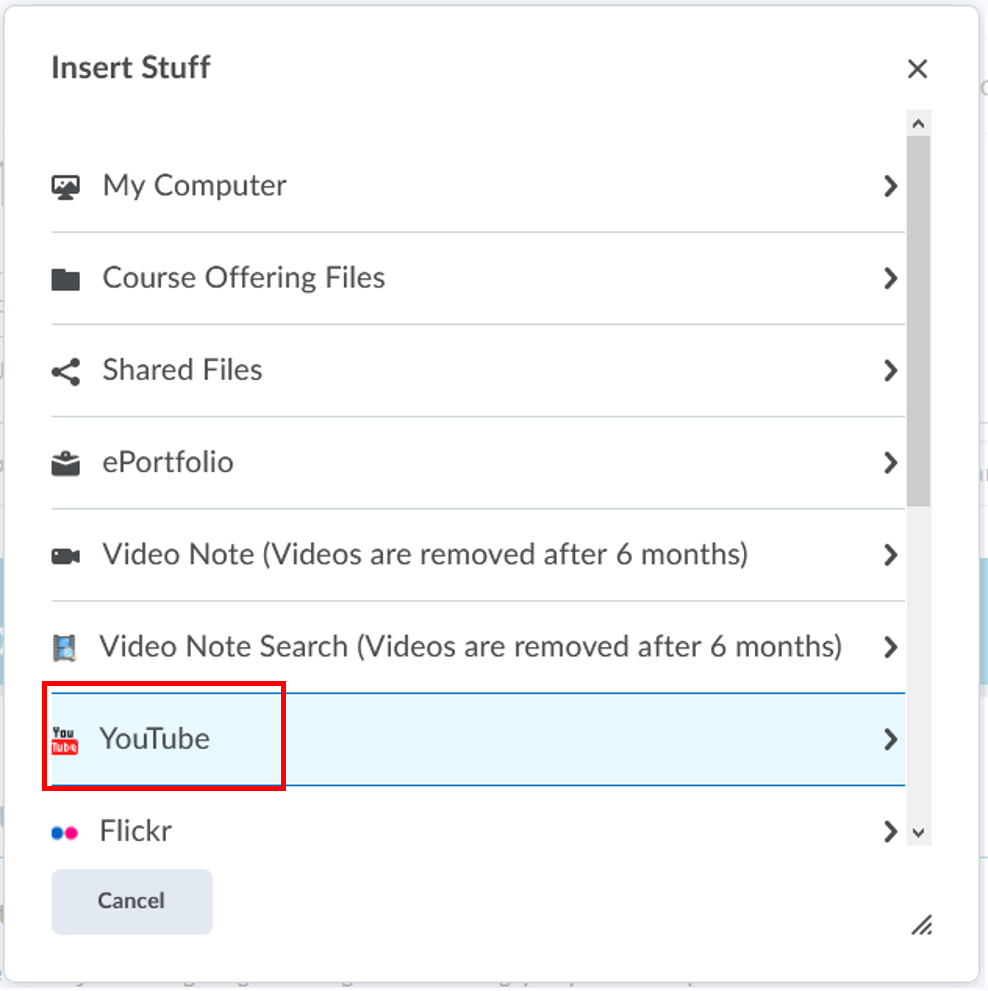
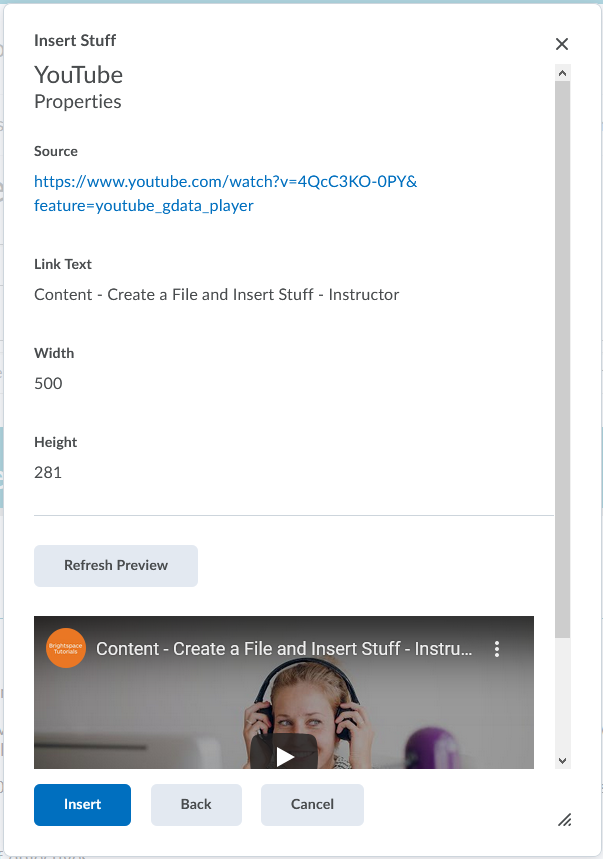
Option 1e: Insert Stuff – YouTube
- The Insert Stuff window will open. Select YouTube from the left area
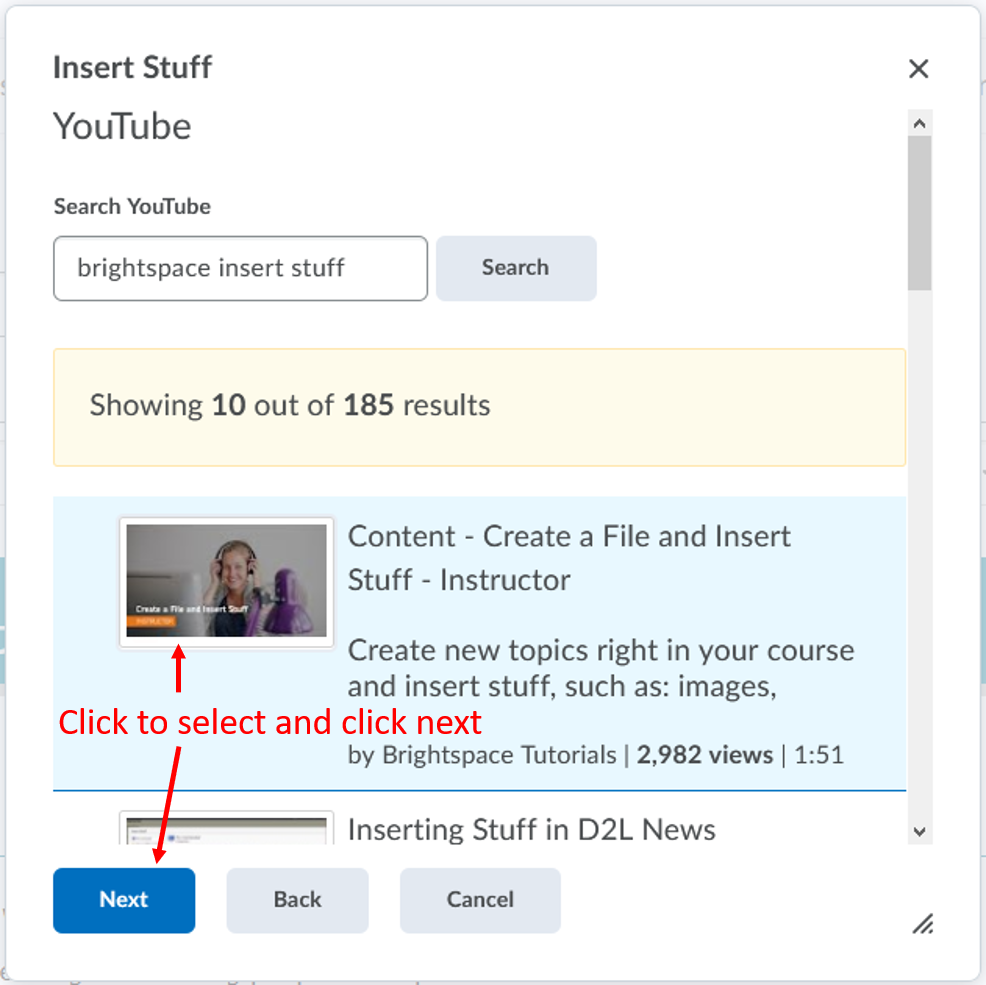
- Enter a keyword in the Search YouTube text box to find a YouTube video and click on the Search button
- Click on the video you want to add and click on the Next button
- You may need to scroll down to preview the video. Click on the Insert button to confirm. You can click on the Back button if the video is not the right one and repeat the previous step
- Follow the next step outside of the Insert Stuff options
- Add additional text as needed on the page. When you are ready, click on the Save and Close button

- Click on the Content link from the course navbar. The new video page should be the last one from the list of the module and you can re-arrange it accordingly. Follow the steps in this guide on Option 2 to learn how to reorder the page
Option 2: Embedding video into an existing html page
These guides will show you steps to embed a video using the Insert Stuff icon and choose the video from My Media, Video Note, Films on Demand, YouTube, or by entering the embed code.
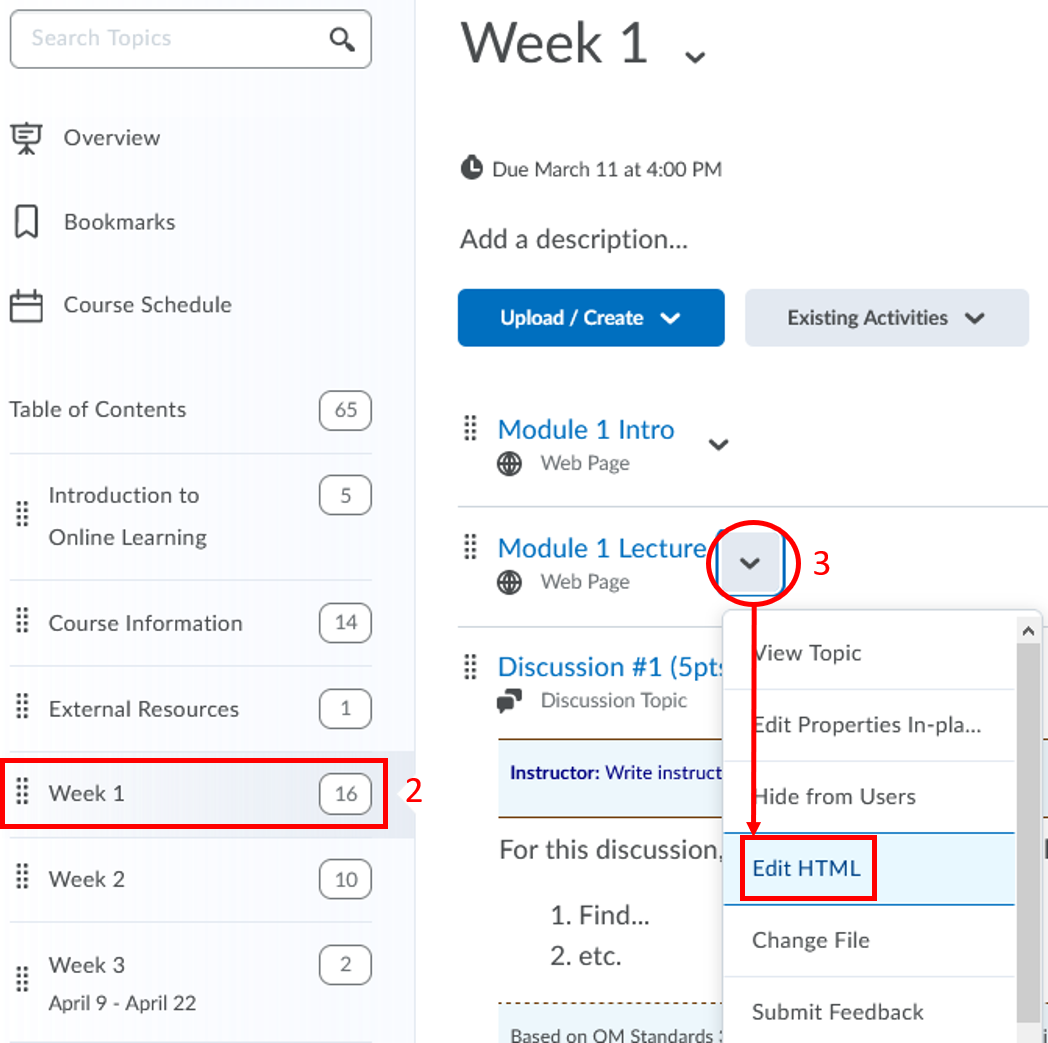
- Click on the Content link from the course navbar
- Select the module on the left side where you would like to add the media file.
- Click on the HTML file where you would like to embed the video. Click the topic’s name action menu and select Edit HTML
- Click the place on the page where you would like the video to appear and click the Insert Stuff icon from the toolbar
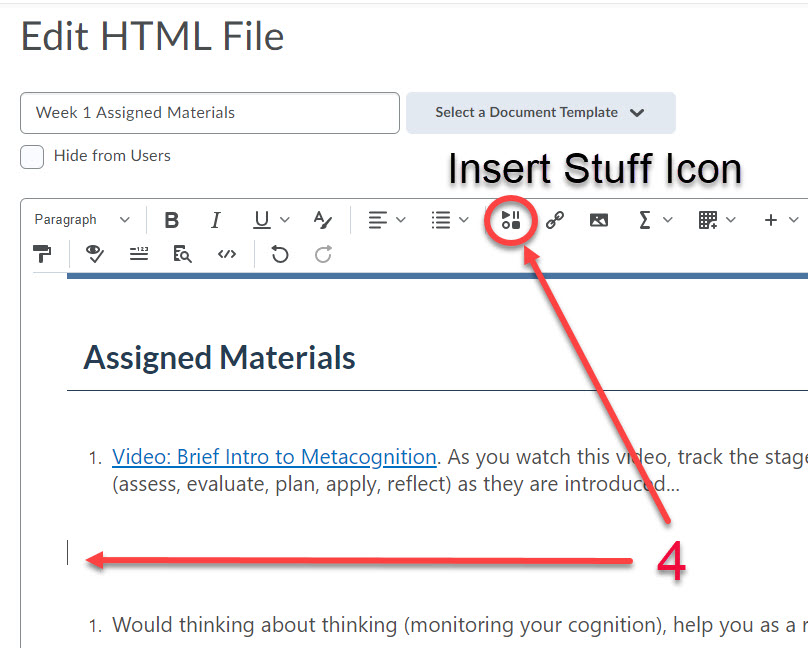
Content-edit html-insert stuff icon
- The Insert Stuff window will open and choose between the following options:
Option 2a: Insert Stuff – My Media (Kaltura)
- The Insert Stuff window will open. Select Embed Kaltura Media Insert Stuff from the left area
- Find the video you want to add from the list and preview the video to make sure the video is the right one for you. Click on the </> Embed button next to the video title to choose.
- Click on the Insert button to confirm. You can click on the Back button if the video is not the right one and repeat the previous step
- Follow the next step outside of the Insert Stuff options
Option 2b: Insert Stuff – video Embed code
You can add a video or a video playlist using the embed code from other websites, such as YouTube. Here is a list of video sites that can use embed code: YouTube, Teacher Tube, Ted, Vimeo, Khan Academy, National Geographic, Discovery Channel, MIT Video, Howcast, Daily Motion, Influxis, etc.
- The Insert Stuff window will open. Select Enter Embed Code from the left area
- Copy the embed code of the video or the video playlist from a website, such as YouTube, and paste it into the Embed Code field. Click on the Next button
- You can preview the video. Click on the Insert button to confirm. You can click on the Back button if the video is not the right one and repeat the previous step
- Follow the next step outside of the Insert Stuff options
Option 2c: Insert Stuff – Films on Demand
Films on Demand is one of our video library resources that you can easily add to the course without having to convert the link first.
- The Insert Stuff window will open. Select Enter Embed Code from the left area
- Enter a keyword in the Search text box to find a video from the Films on Demand video collection and click on the magnifying glass button
- Preview the video from the list by clicking on the video thumbnail. When you’re ready, click on the Embed button next to the video you want to add and choose either Embed Small or Embed medium. Don’t worry about the video size because you’re actually just adding the thumbnail and when your students play the video, they can still change the viewing in the video control to play it fullscreen
- Embed Small is 420 px width x 350 px height (Recommended choice #1)
- Embed Medium is 660 px width x 530 px height (Recommended choice #2)
- Embed Large is 885 px width x 698 px height (Not Recommended)
- It will show you the video thumbnail size (shows Embed medium below) and you can preview the video. Click on the Insert button to confirm. You can click on the Back button if the video is not the right one and repeat the previous step
- Follow the next step outside of the Insert Stuff options
Option 2d: Insert Stuff – Video Note
Video Note is one of the options to quickly create a video or an audio recording within D2L Brightspace. The video will be removed after 6 months. If you want to keep media more than 6 months, create it using Kaltura Capture instead.
- The Insert Stuff window will open. Select Video Note Search from the left area
- Enter a keyword in the Search text box to find a media from your video note collection and click on the Search button
- Click on the video note you want to add and click on the Next button
- You can preview the video. Click on the Insert button to confirm. You can click on the Back button if the video is not the right one and repeat the previous step
- Follow the next step outside of the Insert Stuff options
Option 2e: Insert Stuff – YouTube
- The Insert Stuff window will open. Select YouTube from the left area
- Enter a keyword in the Search YouTube text box to find a YouTube video and click on the Search button
- Click on the video you want to add and click on the Next button
- You may need to scroll down to preview the video. Click on the Insert button to confirm. You can click on the Back button if the video is not the right one and repeat the previous step
- Follow the next step outside of the Insert Stuff options
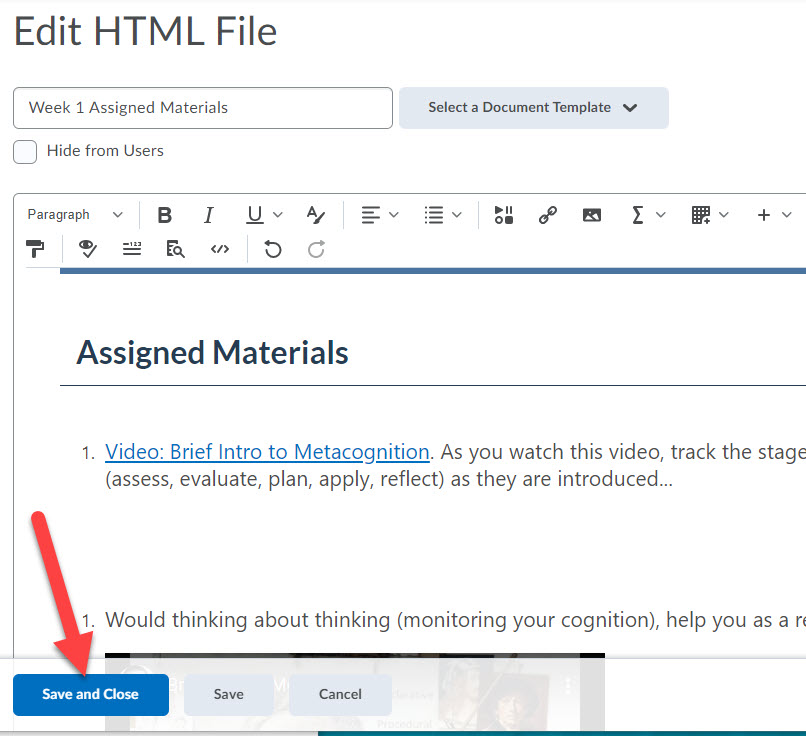
- Add additional text or make your changes as needed on the page. When you are ready, click on the Save and Close button
Option 3: Add a video link from video sites as a Content topic
Add MyMedia Kaltura video as a Content topic link
- Click on the Content link from the course navbar
- Select the module on the left side where you would like to add the link
- Click the Existing Activities action menu and select Embed Kaltura Media Quick Link

- Find the video you want to add from the list and preview the video to make sure the video is the right one for you. Click on the </> Embed button next to the video title to choose.
- The new video link should be the last one from the list of the module and you can re-arrange it accordingly. Follow the steps in this guide on Option 2 to learn how to reorder the page.
The name automatically matches what you have from the MyMedia video title. You can rename it in your course, but it won’t automatically update the actual video title in the MyMedia area.
Add a video link from other websites as a Content topic link
You can add video or audio directly from other websites using the URL or embed the code and add it directly as one of the Content topics inside a module. Here is a list of video sites that can use embed code: YouTube, Teacher Tube, Ted, Vimeo, Khan Academy, National Geographic, Discovery Channel, MIT Video, Howcast, Daily Motion, Influxis, etc.
- Click on the Content link from the course navbar
- Select the module on the left side where you would like to add the link
- Click the Upload/Create action menu and select Video or Audio
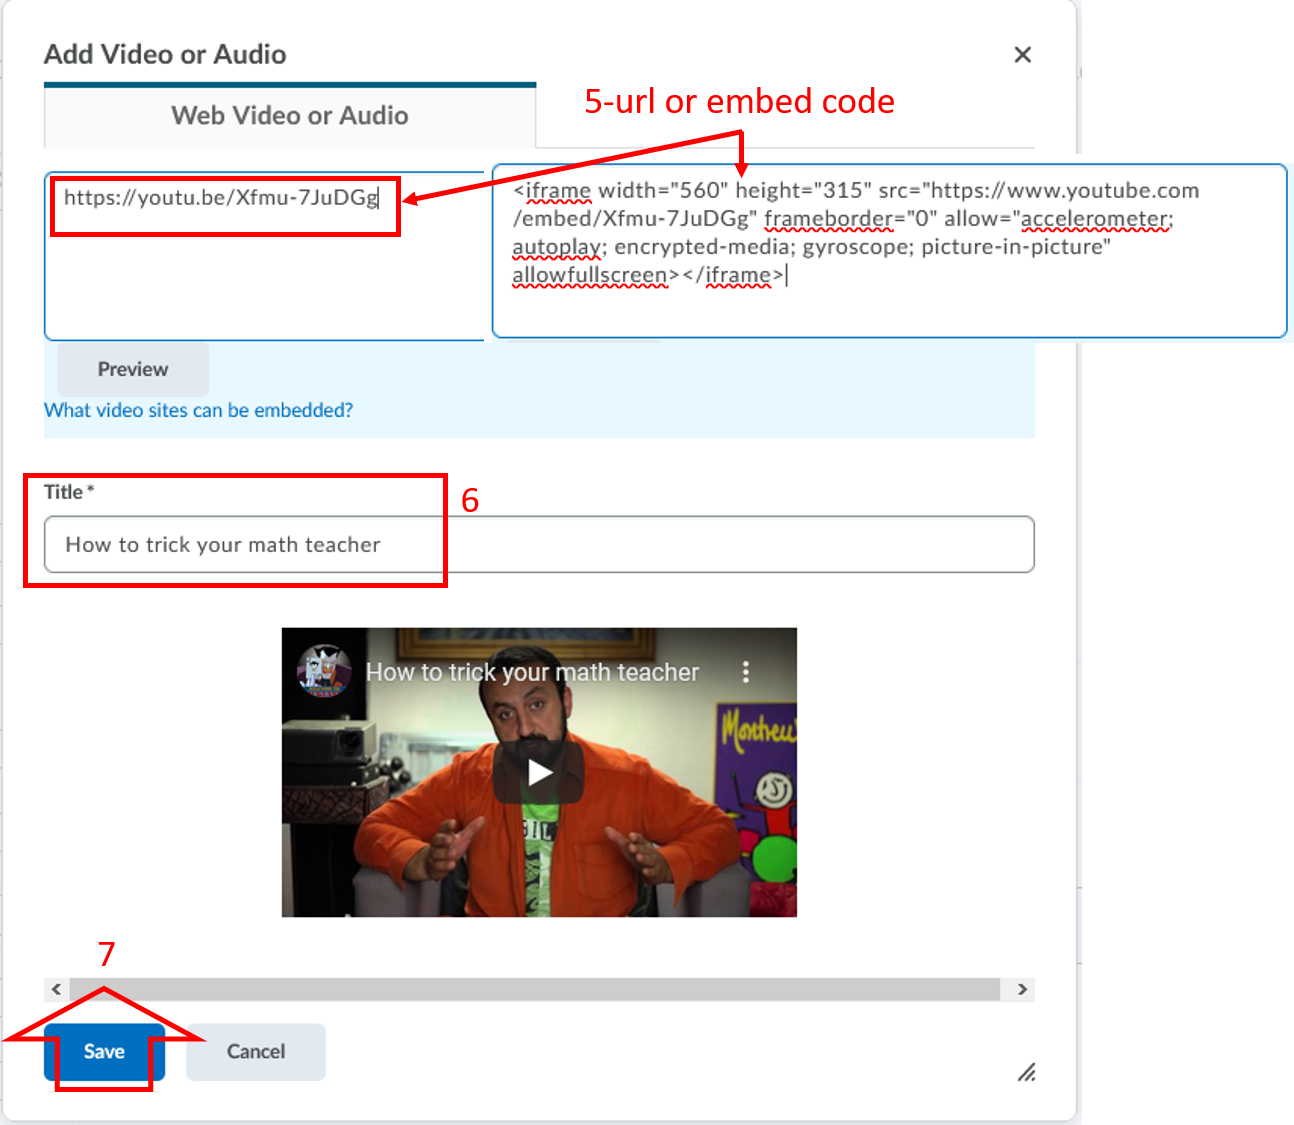
- The Add Video or Audio window will open
- Enter the URL or embed code of the video
- In the Title field, enter a title if one hasn’t been pulled in from the video site or you would like to edit
- Click the Save button, and then you will be able to preview the video.
NOTE: To make sure the video link works properly, click the video link that you just created to preview it.
- Click on the Content link from the course navbar. The new video page should be the last one from the list of the module and you can re-arrange it accordingly. Follow the steps in this guide on Option 2 to learn how to reorder the page
There may be some videos that you can’t add using the method described above. In that case, you can add the video as a link in the Content area, like you’re linking to a website resource.
- Click on the Content link from the course navbar
- Select the module on the left side where you would like to add the link
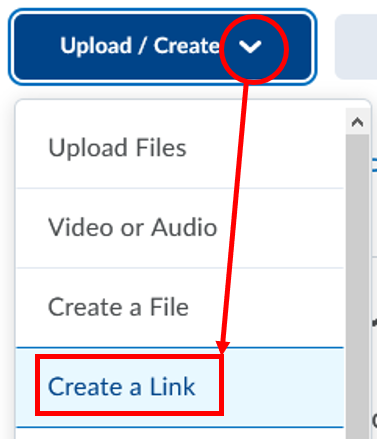
- Click the Upload/Create action menu and select Create a Link
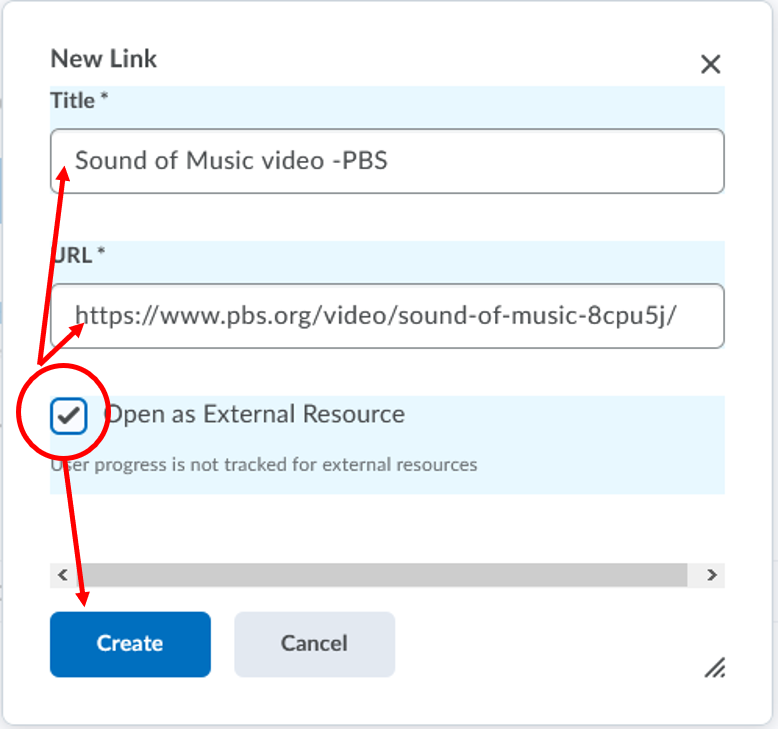
- The New Link window will open. Enter the Title and URL of the video (Note: If possible, you may want to copy and paste the URL instead of typing it to make sure the link is correct)
- Check the box to Open as External Resource, then click on the Create button
- Click on the Content link from the course navbar. The new video page should be the last one from the list of the module and you can re-arrange it accordingly. Follow the steps on this guide on Option 2 to learn how to reorder the page
Option 4: Linking to a PCC library video resources as a Content topic
The best method is to use a link rather than embedding the video if you want a library video to be accessible both on-campus and off-campus. You will need to convert the link to the library video resource first before you can add it to your course.
Films on Demand is one of our video library resources that you can easily add to the course without having to convert the link first. If you want to add a video from Films on Demand, follow the steps from either Option 1c or 2c above.
- To begin, first, convert the original URL of the PCC library video resource that you found using the Link Converter and follow the directions on the page to convert the link
- Once you get the converted link, go to your Brightspace class and click on the Content link from the course navbar
- Select the module on the left side where you would like to add the link.
- Click the Upload/Create action menu and select Create a Link
- The New Link window will open
- In the Title field, enter a link name. For example: “Sport video” (no quotes)
- In the URL field, paste the converted URL of the video from Step 1. For example: “https://www.pcc.edu/resources/instructional-support/access/” (no quotes)
- You must check the box Open as External Resource to open the link in a new window/tab, or the link will not work because it requires secure login for off-campus user
- Click on the Create button, and then you will be able to preview the video. NOTE: To make sure the video link works properly, click the video link that you just created to preview it.
Option 5: Linking to media that the Online Learning team converted for you (e.g. accommodation)
- Click on the Content link from the course navbar
- Select the module on the left side where you would like to add the media file
- Click the Upload/Create action menu and select Add from Manage Files
- The Add a File window will open. Click the videos folder
- Check the box next to the file name of the video that the Online Learning team emailed to you. For example: “career-encounters.html” (no quotes). You can select more than one file if you want to add all the videos to the same module
- Click on the Add button. NOTE: To make sure the video link works properly, click the video link that you just created to preview it.