Navigation Bar Update 2024
Navigation Bar Updates
On December 9th, Online Learning will be restoring instructor access to customize the new standardized navigation bar (navbar) in D2L Brightspace. If you need to customize your navbar, we strongly encourage you to make a copy of the default navbar for your modifications. (instructions below) Consistent navigation is something students have said is important and is a best practice promoted by Quality Matters and others.
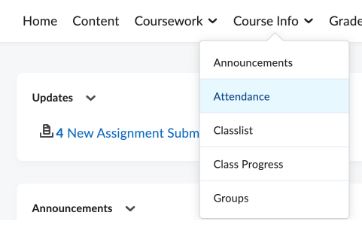
In addition to the navbar customization access, we will add a link to the Attendance tool to the Course Info menu on Monday, December 16th. A number of instructors identified this tool as important to their programs, and the Links workflow did not work well for students and instructors. We have turned off the attendance tool for courses that were not using it so those instructors wouldn’t have to take extra steps to turn it off.
Primary needs
- Students: Consistent navigation among courses.
- Faculty: Ability to provide links to course-specific resources.
As an instructor, you can turn tools off or add custom links to the Links tab in the new NavBar.
Guides
How to turn tools off
 Warning: Turning off a tool will make it unavailable in the entire course, not just the navbar. Only turn off tools you are sure you don’t need on the navbar. Never turn off Content, any tools in the Course Info dropdown and Grades, as this will make them inaccessible to students. Never turn off tools that are not on the navigation bar (see step 3 below).
- Click the Instructor Tools link and select Course Admin.
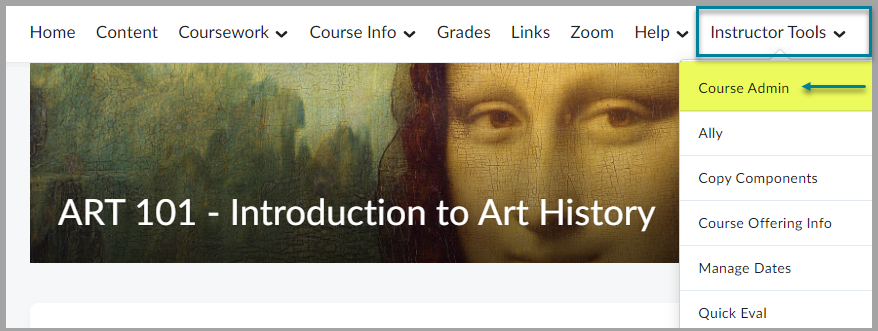
- On the Course Administration page, click Tools.
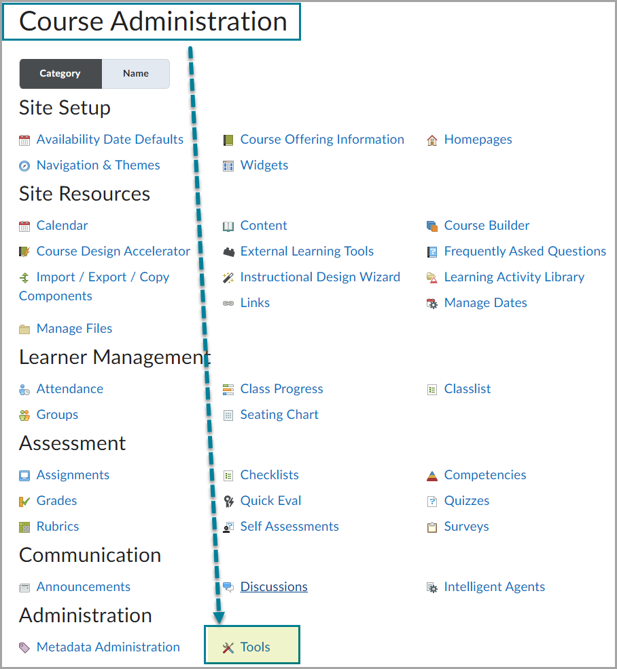
- On the Tool Status page, turn off unused tools (must be options in your navbar – do not disable tools not visible in your navbar)
- For example, turning off the Discussions from the Coursework group in the navbar:
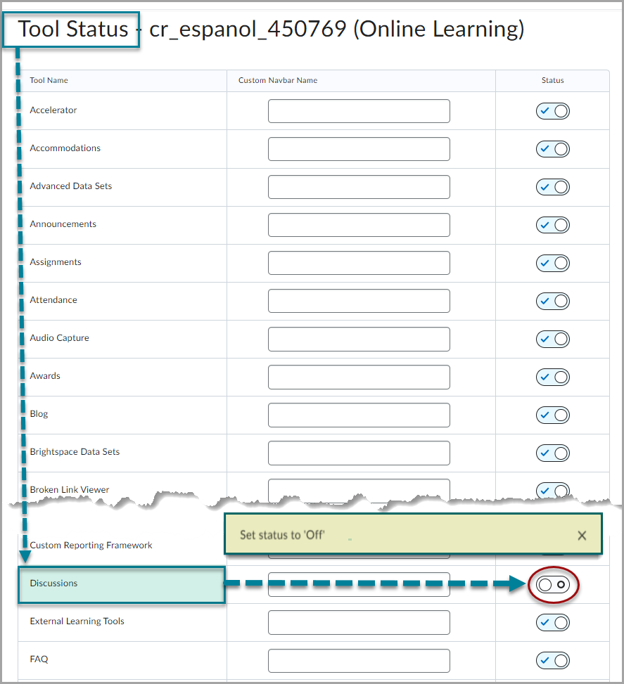
- When you turn off the tool, a Set status to ‘Off’ pop-up message confirms the change.
- For example, turning off the Discussions from the Coursework group in the navbar:
Note: Changes to the settings on this page are saved automatically and will be reflected to your students immediately
How to add custom links
Create a link category
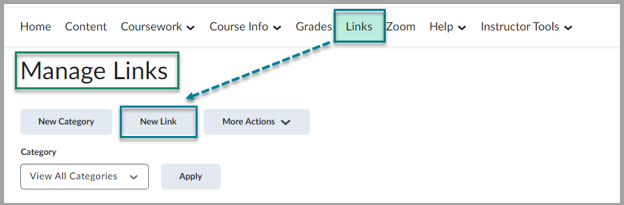
- On the navbar, click Links.
- On the Manage Links page, click New Category.

- Enter your category details.
- Click Save.
Create a single link
- On the navbar, click Links. This will take you to the Manage Links page.
- On the Manage Links page, click New Link.
- Do one of the following:
- To add your link to an existing category,
- From the Category drop-down list, select a category.
- To add your link to a new category,
- Click New Category.
- Enter your category details.
- Click Save.
- To add your link to an existing category,
- Enter a title for your link.
- Do one of the following:
- To add an external link, in the URL area, enter the URL in the field provided.
- To add a quicklink, click the Quicklink icon in the URL area.
- In the Insert Quicklink dialog, navigate to the link you want to insert.
- Click Save.
Delete links and link categories
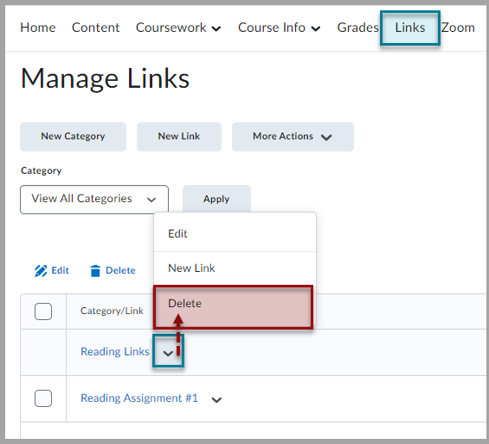
Warning: Deleting a category also deletes all the single links in that category.
- On the navbar, click Links.
- From the context menu of the link or link category you want to delete, click Delete.
- A confirmation window will pop up asking if you are sure you want to delete the category and all the links inside it.
- Click Yes.
- The category will be deleted.
How to pin an Announcement on the Homepage
If you have something, such as a homework site (WebWork) or an OER textbook, which you anticipate students needing very often in the course, in addition to adding it to the “Links” area, you can also put it in a short announcement and then ‘Pin’ that announcement to the top, so it stays visible.
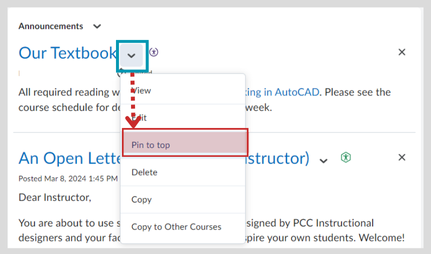
- Create your announcement on the homepage, or in the announcements tool.
- Next to the title of the announcement, select “Pin to top” from the context menu.
- You will know it was successful if you see “Pinned” underneath the announcement title.

Note: If you do this, try to keep your message short so that other announcements are still easily visible to students.
Creating, editing, and activating your navigation bar
Customizing Navigation Bars
Notice: When creating custom navigation bars, you take responsibility for maintaining and updating system and tool links typically managed by Online Learning. This includes essential resources like tutoring links, help options, and tools such as Zoom. Please review the Quarterly Updates to see if any system links have been changed.
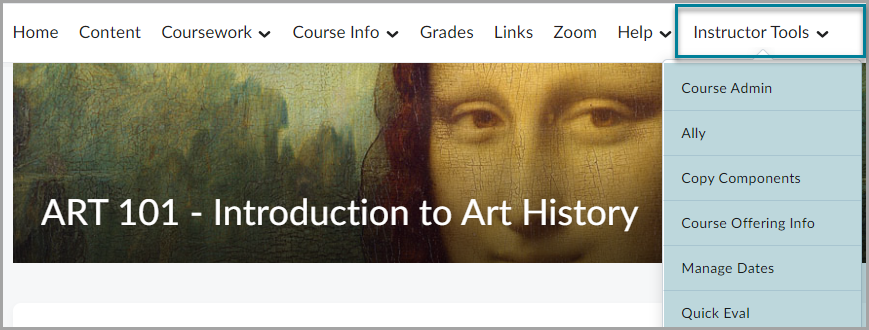
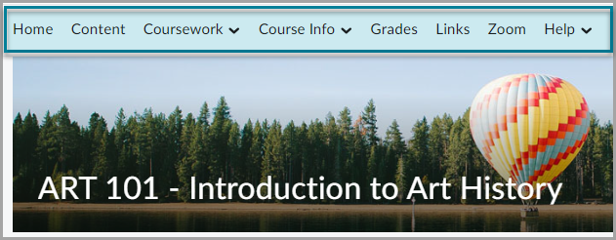
Navbar Display
The Instructor navbar display is different from the Student navbar view
Instructor view
Includes the Instructor Tools drop-down menu group with links for you only.
Student view
Does not include the role-specific Instructor Tools group of links, reducing clutter for student navigation in your course
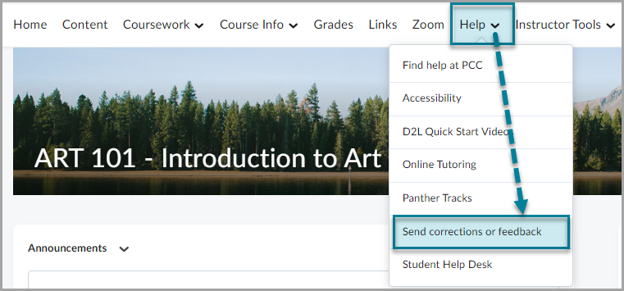
Sending navbar corrections and/or feedback
To send corrections or feedback, click the Help tab and select “Send corrections or feedback.” A new window will open. Follow the prompts to submit your feedback.